|
|

Getting started |

|

|

|

|
|
Getting started |
|
|

|
|
|
|
Getting started |
|
|
|
|
|
Getting started |
|
|
|
|
|
|
||
The following is a step-by-step tutorial that will show you how to display a list of all users from the Kentico CMS database in a table and implement a simple action button using the UniGrid user control:
1. Create a new Web form called User_UniGrid.aspx somewhere in your web project.
2. Add the following directives to the beginning of the page code to register the UniGrid control:
<%@ Register src="~/CMSAdminControls/UI/UniGrid/UniGrid.ascx" tagname="UniGrid" tagprefix="cms" %> <%@ Register Namespace="CMS.UIControls.UniGridConfig" TagPrefix="ug" Assembly="CMS.UIControls" %> |
3. Modify the <%@ Page %> directive at the top of the code as in the following example:
<%@ Page Language="C#" AutoEventWireup="true" CodeFile="User_UniGrid.aspx.cs" Inherits="UniGridExample_User_UniGrid" Theme="Default" %> |
The Theme attribute was added with its value set to "Default", which specifies the default theme used to style the UniGrid control. Please keep in mind that the value of the Inherits attribute depends on the location of the web form, so the example above will not match your code exactly.
4. Now add the following code into the content area of the page (by default between the <div> tags inside the <form> element):
<ajaxToolkit:ToolkitScriptManager ID="manScript" runat="server" EnableViewState="false" /> |
This adds a standard label control, that will be used to display information messages, and the UniGrid control itself (without any configuration for now). The label is not necessary for the functioning of the UniGrid, but it can be very convenient, for example to display error messages.
The ToolkitScriptManager control is required by the UniGrid control. It is only there to ensure that the example is functional by itself and will usually be included on your website's master page, so you do not have to add it in real‑world scenarios.
5. Now extend the definition of the UniGrid control according to the markup below:
<cms:UniGrid ID="UserGrid" runat="server" ObjectType="cms.user" Columns="UserID, UserName" OrderBy="UserName"> |
The basic configuration example above defines only a single action (edit) and one column containing user names, with no additional settings. The data to be displayed is retrieved from user objects, which is achieved by setting the ObjectType property to cms.user. For more details and a full account of the configuration options that can be specified for the UniGrid control, please see the Configuration and UniGrid definition topics.
6. Switch to the code behind of the User_UniGrid.aspx web form and add the following code:
Warning: The name of the class will be different according to the location of your web form.
[C#]
using CMS.SiteProvider; |
This code demonstrates how to implement the task that should be performed when a UniGrid action is used. The parameters of OnAction event handlers are explained below:
•string actionName - is used to identify which action raised the event; this example only has one action, but the UniGrid control often contains more in real scenarios. The name passed into this parameter is defined through the UniGrid's configuration in the Name attribute of individual Action elements.
•object actionArgument - is used to pass the value of a data source column from the UniGrid row for which the action was used. The used column can be specified through the configuration in the commandargument attribute of individual Action elements, otherwise the first column in the data source is used by default.
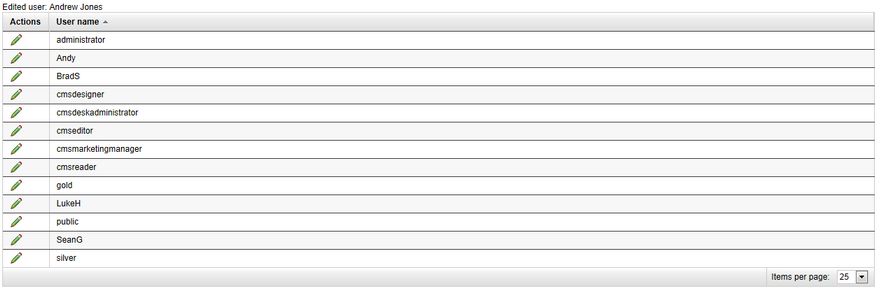
This example only displays the full name of the "edited" user in the label above the UniGrid when the edit button is clicked, but any required action can be implemented in a similar fashion.
7. Save the changes to all files. Now right-click the web form in the Solution Explorer and select View in Browser. The resulting page should display a table containing user names and edit action buttons. If you click one of the edit buttons, the full name of the user on the same row will be displayed above the grid, similar to the following: