|
|

Hybrid storage scenarios |

|

|

|

|
|
Hybrid storage scenarios |
|
|

|
|
|
|
Hybrid storage scenarios |
|
|
|
|
|
Hybrid storage scenarios |
|
|
|
|
|
|
||
In some situations, it may be beneficial to store the files of an on‑premise website on a Windows Azure storage account rather than on a local disk. For example, if your server has a limited storage capacity and you need to save large amounts of file data, using Windows Azure may be more convenient than upgrading your server, especially if the increased requirements are only temporary.
To set up this type of hybrid scenario with a Kentico CMS website, you need to configure the project to connect to the appropriate storage account:
1. Edit your website's web.config file and add the following key into the <appSettings> section:
<add key="CMSExternalStorageName" value="Azure" /> |
This configures the application to use a Windows Azure Storage account for its file system. It is not necessary to set this key if the application itself is hosted on Windows Azure. Optionally, you may also set the two keys below:
Key |
Description |
Sample Value |
CMSAzureTempPath |
The folder specified by this key will be used to store temporary files on a local disk, e.g. when transferring large files to or from the storage account. |
<add key="CMSAzureTempPath" value="C:\AzureTemp" /> |
CMSAzureCachePath |
Specifies a folder on a local disk where files requested from the storage account will be cached. This helps minimize the amount of blob storage operations, which saves time and resources. |
<add key="CMSAzureCachePath" value="C:\AzureCache" /> |
2. The next step is to specify the target storage account and ensure that your application can authenticate itself against it. You can create or view your storage account on the Windows Azure Management Portal (https://windows.azure.com/). Go to Hosted Services, Storage Accounts & CDN -> Storage Accounts, select the account that you wish to use. Its properties will be displayed on the right.
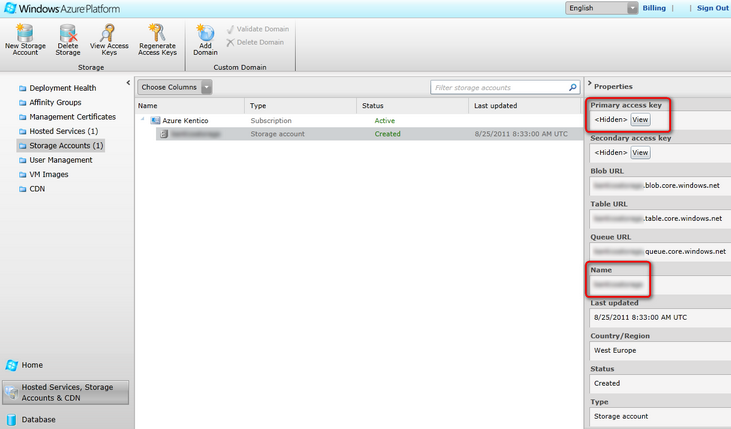
Copy your storage account's Name and Primary access key, and enter them as the values of the CMSAzureAccountName and CMSAzureSharedKey web.config keys in the <appSettings> section:
<add key="CMSAzureAccountName" value="AccountName"/> |
3. Save the changes to the web.config file and Build your project. All new files should now be stored in the cloud on the given storage account.
|
Additional website settings
When configuring this type of scenario, keep in mind that the website itself must be configured to store files in the file system rather than in the database only. Open the administration interface of your website, go to Site Manager -> Settings -> System -> Files and make sure that Store files in file system is checked.
It is also recommended to enable Redirect files to disk in the System -> Performance settings category. This means that files will be requested from the Azure Storage account rather than from the database (if possible).
|
