|
|

Overview |

|

|

|

|
|
Overview |
|
|

|
|
|
|
Overview |
|
|
|
|
|
Overview |
|
|
|
|
|
|
||
The Insert image or media dialog can be used to insert the following types of files:
•Images - bmp, gif, ico, png, wmf, jpg, jpeg, tiff, tif.
•Audio - wav, wma, mp2, mp3, mid, midi, mpga.
•Video - avi, mp4, mpg, mpeg, wmv, qt, mov, rm.
•Flash - swf.
Custom types can be added as described in the Configuring custom file types topic of the Modules -> Media libraries chapter.
The dialog can be opened by clicking the Insert/edit image or media (![]() ) icon, as highlighted in the screenshot below.
) icon, as highlighted in the screenshot below.

After clicking the icon, the following dialog will be displayed:
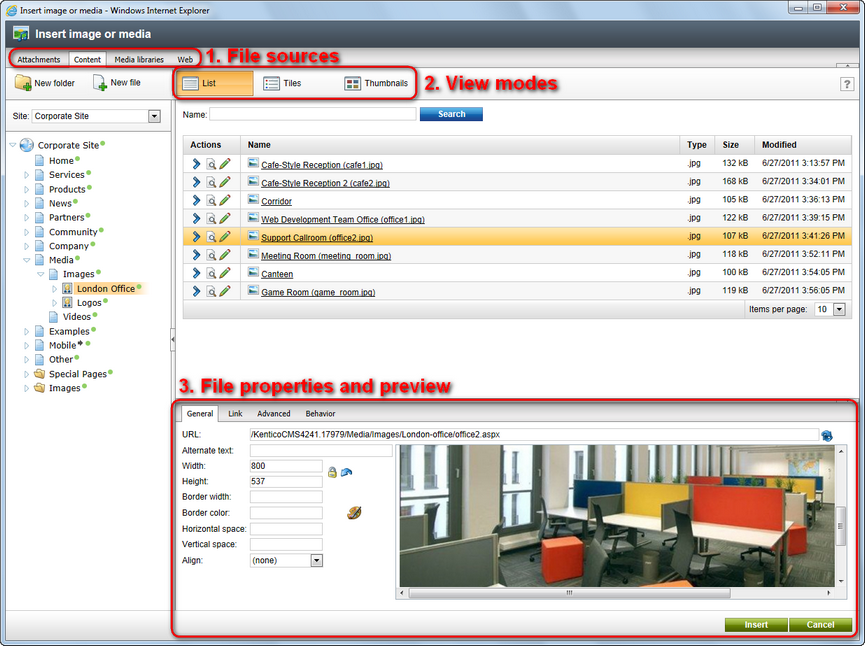
The highlighted parts of the dialog have the following functions. Their position may vary based on the selected file source:
1.File sources - using these four tabs, you can select from where the inserted files should be taken. Please refer to the File sources topic for more details.
2.View modes - using these buttons, you can switch between different modes of viewing files listed in the dialog. Please refer to the View modes topic for more details.
3.File properties - in this section, you can define properties of a file inserted into the text; the properties are different for images, audio/video and flash.
1.Place the cursor in the appropriate position in the WYSIWYG editor.
2.Click the Insert/edit image or media (![]() ) icon.
) icon.
3.The dialog window opens. Select the appropriate file source tab according to from where you want to add the file.
4.Locate and select the file on the tab.
5.Appropriate properties according to the file type are displayed. Specify the required properties and click the Insert button.
6.The required code is inserted into the WYSIWYG editor.