|
|

Banning an IP address |

|

|

|

|
|
Banning an IP address |
|
|

|
|
|
|
Banning an IP address |
|
|
|
|
|
Banning an IP address |
|
|
|
|
|
|
||
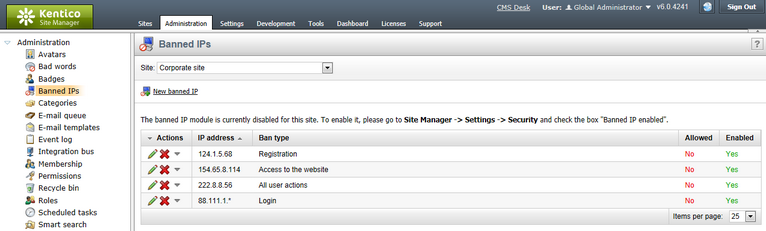
Banned IPs can be managed in Site Manager -> Administration -> Banned IPs. Alternatively, you can access the same page from CMS Desk -> Administration, but you can manage banned IPs only for the currently edited site.
From the Site drop-down list, choose the site you want to add the IP for and click the New banned IP link.
Enter the required details:
IP Address |
IP address to be banned. The asterisk ( * ) wildcard can be used as a substitute for any number in the IP address, substituting for all values from 0 to 255. Example: 192.168.1.* |
Ban type |
Type of the ban. The following types are available: •Access to the website - users cannot access the site from the entered address at all •Login - users cannot log in from the entered address •Registration - users cannot register from the entered address •All user actions - users can enter the site from this IP, but specific actions will not be allowed |
Enabled |
If unchecked, the ban takes no effect. |
Ban Reason |
Text description of why the IP was banned. |
Ban IP address |
If selected, this IP address will be banned. |
Allow IP address for this site if the IP address is banned globally |
If selected, this IP address will be allowed for the selected site even if it is banned globally. |
Allow site to override the ban |
If checked, this ban can be overridden by bans set for particular sites; can be set only for global bans. |
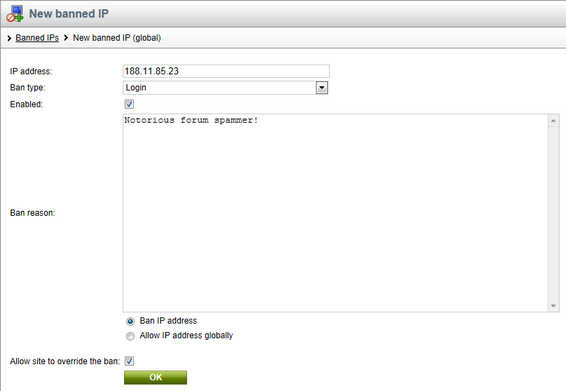
When you have all details entered, click OK.
Now if you go back to the list of banned IPs, you should see the newly created record present in the list.
Editing an existing ban
If you want to edit the record in the future, just go to the list and click the Edit (![]() ) icon next to the record. The same page will be displayed as when creating a new record, but with details entered. To make the desired changes, just change the appropriate values and click OK.
) icon next to the record. The same page will be displayed as when creating a new record, but with details entered. To make the desired changes, just change the appropriate values and click OK.