|
|

Scheduling custom code |

|

|

|

|
|
Scheduling custom code |
|
|

|
|
|
|
Scheduling custom code |
|
|
|
|
|
Scheduling custom code |
|
|
|
|
|
|
||
The process of scheduling a custom task includes two steps: Writing the code that performs the required actions and registering it in the CMS as a scheduled task.
Each scheduled task must be defined by a class that implements the CMS.Scheduler.ITask interface.
To integrate this type of class into the application, you can add a new assembly (Class library) to your project and include it there. In this case, it is necessary to add the appropriate references to both the assembly and the main CMS project.
Alternatively, you can define scheduled tasks in App_Code without the need to compile an assembly. This approach is described in the example below:
1. Open your web project, expand the App_Code folder (or Old_App_Code if you installed Kentico CMS as a web application), navigate to the Samples\Classes folder and edit the MyTask.cs file. This file already contains a sample class that follows the basic structure required for a scheduled task. Modify the code according to the following:
[C#]
namespace Custom string detail = "Executed from '~/App_Code/Samples/Classes/MyTask.cs'. Task data:" |
The Execute method must always be included when writing a scheduled task. It is called whenever the given task is executed, so it must contain all code implementing the required functionality. In this example, the task only creates a record in the application's event log so that you can confirm that it is being executed. The TaskInfo parameter of the method can be used to access the data fields of the corresponding scheduled task object. As you can see in the code above, the content of the TaskData field is added into the details of the event log entry.
The string returned by the method will be displayed in the administration interface when the task is executed and can be used to describe the result. You can leave it as null in this case.
Save the changes made to the file.
2. Next, it is necessary to ensure that the MyTask class is loaded when the given scheduled task is executed. Expand the Samples\Modules folder and open the SampleClassLoaderModule.cs file, which demonstrates how this can be done. You do not have to make any modifications for the purposes of this example, since the sample class loader handles the Custom.MyTask class by default.
An object of the appropriate class is assigned by the ClassHelper_OnGetCustomClass event handler:
[C#]
/// <summary> // Gets an object of the MyTask class implementing the ITask interface. case "Custom.MyTask": ... |
In the case of scheduled tasks, the value of the ClassName property of the handler's ClassEventArgs parameter will match the Task class name specified for the given task (Custom.MyTask in this example). The value is checked to identify which specific task was executed, so that an instance of the correct class can be created and passed on.
Build the project if you installed it as a web application.
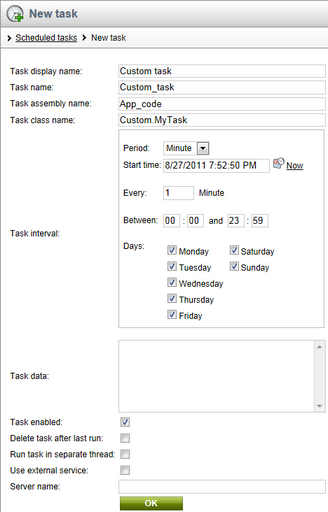
Go to Site Manager -> Administration -> Scheduled tasks and select the Site for which the task should be scheduled (or (global) if it should be performed for all sites or affect global objects). Next, click the ![]() New task link and fill in the properties of the task according to the following:
New task link and fill in the properties of the task according to the following:
•Task display name - Custom task; sets a name for the task that will be shown in the administration interface.
•Task name - Custom_task; sets a name that will serve as an identifier for the scheduled task.
•Task assembly name: App_Code; this field must contain the name of the assembly where the task is implemented.
•Task class name: Custom.MyTask; specifies the exact class (including any namespaces) that defines the functionality of the scheduled task.
•Task interval - sets the time interval between two executions of the task. This does not ensure that the task will be executed at the exact time, only that it will be considered ready to be executed. The precise execution time depends on the general settings of the scheduler.
•Task data - data which should be provided to the assembly. This field can be accessed from the code of the task, so it can be used as a parameter to easily modify the task without having to edit its implementation. In this example, any entered content will be included in the details of the event log entry created by the task.
•Task enabled: yes (checked); this field indicates if the task should be scheduled.
•Delete task after last run - indicates if the task should be deleted after its final run (applicable if the task is set to run only once).
•Run task in separate thread - indicates if the task should be executed in a separate thread in order to improve application performance.
•Use external service - indicates if the task should be processed by the Scheduler Windows service instead of the web application itself. If the Use external service setting in Site Manager -> Settings -> System is disabled, even tasks with this option enabled are processed by the application itself. The option is available only for some scheduled tasks. The ones that do not have it available in their editing interfaces can only be processed by the application itself.
|
Important!
Custom tasks implemented in the App_Code folder cannot be executed by the external Windows service. If you wish to run a custom task this way, it is necessary to add a new assembly to your project and then define the task class there. |
•Server name - name of the web farm server where the task should be executed. This field is applicable only if your application runs in a web farm environment.
•Create tasks for all web farm servers - if checked, tasks will be created for all web farm servers and the Server name field will be grayed out. This field is displayed only if your application runs in a web farm environment.
Click OK. The task will now be executed regularly according to the specified interval.
To check the results once the task is enabled, go to Site Manager -> Administration -> Event log and look for entries with MyTask as their Source.

