|
|

Getting started |

|

|

|

|
|
Getting started |
|
|

|
|
|
|
Getting started |
|
|
|
|
|
Getting started |
|
|
|
|
|
|
||
The following is a step-by-step tutorial that will show you how to add a custom pager to a CMSRepeater control that displays Smartphones (CMS.Smartphone documents) using the TemplateDataPager control:
1. Create a new Web form somewhere in your website installation directory.
2. Now add the following code to the page, inside the <form> element:
<ajaxToolkit:ToolkitScriptManager ID="manScript" runat="server" EnableViewState="false" /> <table style="border: solid 1px #CCCCCC; margin-left: auto; margin-right: auto;"> <tr> <td style="border-bottom: solid 1px #CCCCCC; padding: 10px; text-align: center;"> <cms:CMSRepeater ID="CMSRepeater1" runat="server" Path="/%" ClassNames="CMS.Smartphone" TransformationName="Ecommerce.Transformations.Product_Default"> </cms:CMSRepeater> </td> </tr> <tr> <td style="padding: 10px; background-color: #D9D9D9;"> <cms:TemplateDataPager ID="TemplateDataPager1" runat="server"> <NumberTemplate> <a href="?Page=<%# Eval("PageNumber") %>"> <%# Eval("PageNumber") %> </a> </NumberTemplate> <SelectedNumberTemplate> <b> <%# Eval("PageNumber") %> </b> </SelectedNumberTemplate> <SeparatorTemplate> - </SeparatorTemplate> <FirstItemTemplate> <a href="?Page=1">First</a> | </FirstItemTemplate> <LastItemTemplate> | <a href="?Page=<%# pageCount %>">Last</a> </LastItemTemplate> <PreviousItemTemplate> <a href="?Page=<%# previousPage %>">Previous</a> | </PreviousItemTemplate> <NextItemTemplate> | <a href="?Page=<%# nextPage %>">Next</a> </NextItemTemplate> </cms:TemplateDataPager> </td> </tr> </table> |
As you can see, the control uses a standard CMSRepeater control to display data. The pager format is specified using the templates defined between the tags of the <cms: TemplateDataPager> element.
The ToolkitScriptManager control included at the top is required by the transformation used to display smartphone documents. It is only there to ensure that the example is functional by itself and will usually be included on your website's master page.
3. Modify the code-behind so that it looks like this (the class name and type may be different):
[C#]
using CMS.GlobalHelper;
public partial class CMSControlsExamples_TemplateDataPager : System.Web.UI.Page { public string pageCount = "1"; public string previousPage = "1"; public string nextPage = "";
/// <summary> /// OnInit override /// </summary> /// <param name="e"></param> protected override void OnInit(EventArgs e) { // Disable repeater pager and databindbydefault CMSRepeater1.EnablePaging = false; CMSRepeater1.DataBindByDefault = false;
base.OnInit(e); }
protected void Page_Load(object sender, EventArgs e) { // Get repeater datasource TemplateDataPager1.DataSource = CMSRepeater1.DataSource;
// Set page size TemplateDataPager1.PageSize = 1;
// Set current page from query string TemplateDataPager1.CurrentPage = ValidationHelper.GetInteger(Request.QueryString["Page"], 1);
// Get page number for last link pageCount = ((int)(TemplateDataPager1.PageCount - 1)).ToString();
// Set default next page link nextPage = pageCount;
// Set previous link if ((TemplateDataPager1.CurrentPage - 1) >= 1) { previousPage = ((int)(TemplateDataPager1.CurrentPage - 1)).ToString(); }
// Set next link if ((TemplateDataPager1.CurrentPage + 1) <= (TemplateDataPager1.PageCount - 1)) { nextPage = ((int)(TemplateDataPager1.CurrentPage + 1)).ToString(); }
// Set paged datasource to the repeater and databind it CMSRepeater1.DataSource = TemplateDataPager1.PagedData; if (!DataHelper.DataSourceIsEmpty(CMSRepeater1.DataSource)) { CMSRepeater1.DataBind(); } } } |
This code binds the TemplateDataPager to the CMSRepeater.
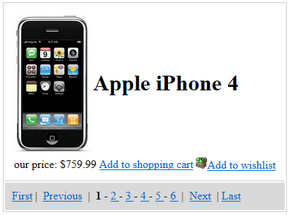
4. Save the changes to the web form. Now right-click it in the Solution explorer and select View in Browser. The resulting page should look like this: