|
|

Getting started |

|

|

|

|
|
Getting started |
|
|

|
|
|
|
Getting started |
|
|
|
|
|
Getting started |
|
|
|
|
|
|
||
The following is a step-by-step tutorial that will show you how use the DataPager control with a CMSRepeater control that displays all pages (menu items) in the system:
1. Create a new Web form somewhere in your website installation directory.
2. Switch to its Design tab, drag and drop a CMSRepeater control from the toolbox onto the form and set its following properties:
•ClassNames: cms.menuitem
•EnablePaging: True
This tells the control which document types to read and enables the DataPager.
3. Switch to the Source tab and add the code marked by the CMSRepeater templates comments between the <cms:CMSRepeater> tags. The overall code of the CMSRepeater control should look like this:
<cms:CMSRepeater ID="CMSRepeater1" runat="server" ClassNames="cms.menuitem" EnablePaging="true" >
<%-- CMSRepeater templates ---------------------------------------------------------- --%> <ItemTemplate> <%# HTMLHelper.HTMLEncode( Convert.ToString(Eval("NodeAliasPath"))) %> </ItemTemplate> <AlternatingItemTemplate> <font color="#999999"><%# HTMLHelper.HTMLEncode( Convert.ToString(Eval("NodeAliasPath"))) %> </font> </AlternatingItemTemplate> <SeparatorTemplate> </li> <li> </SeparatorTemplate>
<%-- CMSRepeater templates ---------------------------------------------------------- --%>
</cms:CMSRepeater> |
This sets the templates used by the CMSRepeater to display the pages (menu items). The control dynamically replaces the <%# ... %> tags with values of the currently displayed record. This is then repeated for every record in the data source.
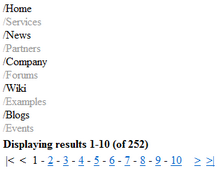
6. Save the changes to the web form. Now right-click it in the Solution explorer and select View in Browser. The resulting page should look like this: