|
|

Appearance and styling |

|

|

|

|
|
Appearance and styling |
|
|

|
|
|
|
Appearance and styling |
|
|
|
|
|
Appearance and styling |
|
|
|
|
|
|
||
The appearance of the CMSTreeMenu control is determined by the CSS classes it uses and by some of its properties.
You can use the following CSS classes to modify the design of the control:
Class Name |
Description |
CMSTreeMenuTable |
The main table (TABLE element). |
CMSTreeMenuItem |
Tree menu item (TD element). |
CMSTreeMenuItemAlt |
Alternating style of the menu item (TD element). It's used only when you set the UseAlternatingStyles property to true. |
CMSTreeMenuSelectedItem |
Selected tree menu item (TD element). |
CMSTreeMenuLink |
Link (A element). |
CMSTreeMenuLinkAlt |
Alternating style of the link (A element). It's used only when you set the UseAlternatingStyles property to true. |
CMSTreeMenuSelectedLink |
Link of the selected item (A element). |
CMSTreeMenuNestedTable |
Nested table (TABLE element). It's used only when CollapseSelectedNodeOnClick is true. |
The recommended place to define these classes is in a stylesheet in the Kentico CMS administration interface at Site Manager -> Development -> CSS stylesheets. These stylesheets can be applied to individual documents (pages) that contain the control in CMS Desk -> Content -> Edit -> Properties -> General -> CSS stylesheet.
Please refer to Using the CSSPrefix property to learn how to add prefixes to these classes to customize items at any menu level.
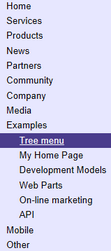
The following is an example of how CSS styles can be applied to a CMSTreeMenu control. If you wish to create this example for yourself, please follow the tutorial in the Getting started topic, then continue with the following steps:
1. Set the following properties of the CMSTreeMenu control:
•Indentation: 5
This specifies the indentation used for lower menu levels.
The code of the control should now look like the following:
<cms:CMSTreeMenu ID="CMSTreeMenu1" runat="server" Indentation="5" /> |
Save the changes to the web form.
2. Now log in to the sample Corporate Site, go to Site Manager -> Development -> CSS stylesheets, edit (![]() ) the Corporate Site stylesheet and add the following classes:
) the Corporate Site stylesheet and add the following classes:
/* Tree Menu design */ |
This will modify the appearance of the tree menu. The created page should use this stylesheet by default.
3. Now if you look at the page using the created template on the website, the tree menu will have its appearance modified: