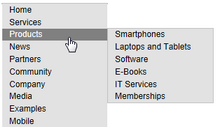
<style type="text/css" media="screen">
/* Vertical menu class definitions*/
.Vertical { BORDER-RIGHT: #c2c2c2 1px solid; BORDER-TOP: #c2c2c2 1px solid; FONT-SIZE: 12px; BORDER-LEFT: #c2c2c2 1px solid; WIDTH: 150px; BORDER-BOTTOM: #c2c2c2 1px solid; FONT-FAMILY: Arial; BACKGROUND-COLOR: #e2e2e2 }
.Vertical UL { PADDING-RIGHT: 0px; PADDING-LEFT: 0px; PADDING-BOTTOM: 0px; MARGIN: 0px; PADDING-TOP: 0px; LIST-STYLE-TYPE: none }
.Vertical LI { POSITION: relative; FLOAT: left; WIDTH: 100% }
.Vertical A { PADDING-RIGHT: 0px; BACKGROUND-POSITION: 0px 50%; DISPLAY: block; PADDING-LEFT: 10px; PADDING-BOTTOM: 2px; MARGIN: 0px; WIDTH: 140px; COLOR: black; PADDING-TOP: 2px; BACKGROUND-REPEAT: no-repeat; BACKGROUND-COLOR: #e2e2e2; TEXT-DECORATION: none }
.Vertical A:hover { BACKGROUND: #808080 no-repeat 0px 50%; COLOR: white }
.Vertical UL UL { BORDER-RIGHT: #c2c2c2 1px solid; BORDER-TOP: #c2c2c2 1px solid; Z-INDEX: 100; LEFT: 100%; BORDER-LEFT: #c2c2c2 1px solid; WIDTH: 100%; BORDER-BOTTOM: #c2c2c2 1px solid; POSITION: absolute; TOP: -1px }
#Vertical1 UL { DISPLAY: none }
#Vertical1 LI:hover UL UL { DISPLAY: none }
#Vertical1 UL LI:hover UL UL { DISPLAY: none }
#Vertical1 LI:hover UL { DISPLAY: block }
#Vertical1 UL LI:hover UL { DISPLAY: block }
#Vertical1 UL UL LI:hover UL { DISPLAY: block }
</style>
|


