|
|

Getting started |

|

|

|

|
|
Getting started |
|
|

|
|
|
|
Getting started |
|
|
|
|
|
Getting started |
|
|
|
|
|
|
||
The following is a step-by-step tutorial that will show you how to display an editable region, which works as an HTML editor, using the CMSEditableRegion control:
1. Create a new Web form in your website installation directory under the CMSTemplates/CorporateSite folder and check the Select master page box.
2. The Select a Master Page dialog appears. Choose the folder CMSTemplates/CorporateSite and choose the root.master file and click OK..
3. Follow the remaining steps of the guide found in the Using ASPX page templates topic.
4. Switch to the Design tab and drag and drop a CMSEditableRegion control from the toolbox onto the form and set its following properties:
•RegionTitle: Region Example
•DialogHeight: 200
•RegionType: HTMLEditor
•HTMLAreaToolbarLocation: In
This specifies the height of the editable region, tells the control that the region should act as an HTML editor and that the toolbar of the editor should be displayed directly above the region.
5. Switch to the Source tab. The code of the CMSEditableRegion control should look like this:
<cms:CMSEditableRegion ID="CMSEditableRegion1" runat="server" RegionTitle="Region Example" DialogHeight="200" RegionType="HTMLEditor" HtmlAreaToolbarLocation="In" /> |
It's not necessary to add the CMSPageManager control onto the web form, as there is already a CMSPortalManager control on the root.master master page.
6. Save the changes to the web form. Now if you look at the page using the created template on some website, it will display an editable region in the Edit mode of CMS Desk similar to the following:
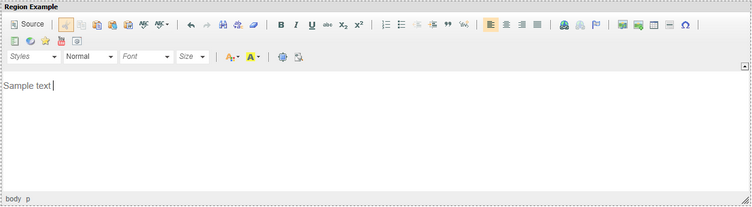
Now if you enter some content and press the Save button, it will be displayed on the live site version of the page without the editor.