|
|

Creating the Template page |

|

|

|

|
|
Creating the Template page |
|
|

|
|
|
|
Creating the Template page |
|
|
|
|
|
Creating the Template page |
|
|
|
|
|
|
||
This page is a special one. It will be used as a template for the group pages section, which is created for each group under a specified page of the content tree, which we will create in this chapter. The group pages section enables members of a group to create and edit articles related to the group and displayed within the group's section.
On this page, there will be a Repeater displaying a list of articles of the particular group. This page will also be used as a master page for the Pages page, which will be displaying the particular articles placed under it. The Pages page will be created in the following chapter.
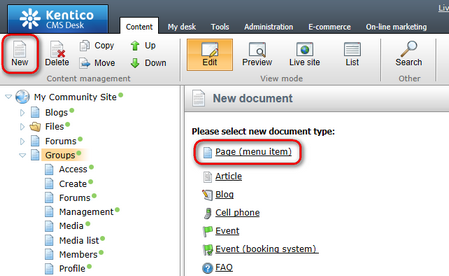
1. Select the Groups page in the content tree and click New. Choose the Page (menu item) document type.
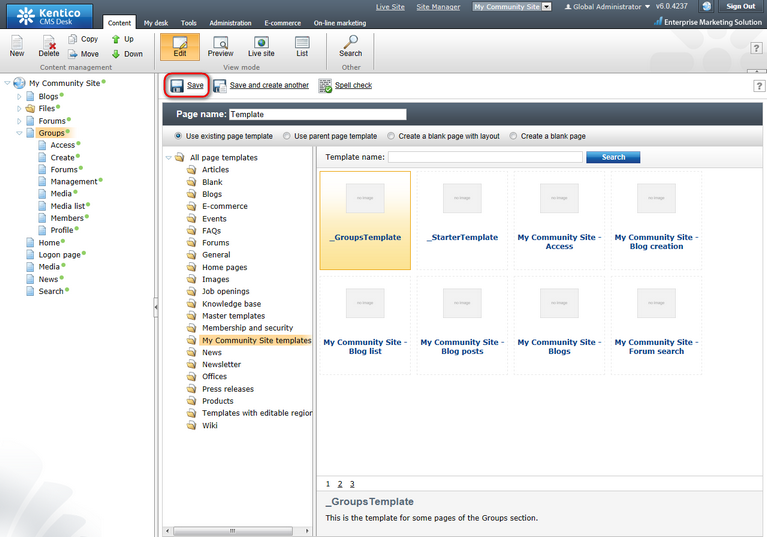
2. Select the My Community Site templates -> _GroupsTemplate created in this chapter. Into the Page name field, enter Template and click Save.
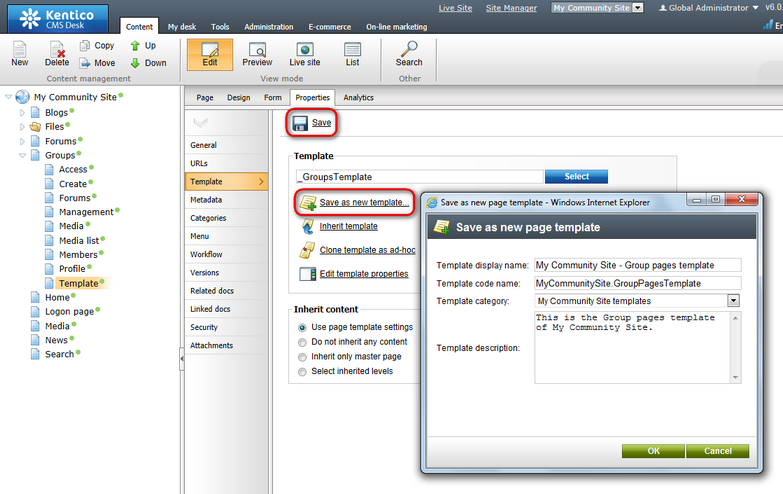
3. Switch to the Properties -> Template tab and click the Save as new template link. Enter the following details in the pop-up dialog:
•Template display name: My Community Site - Group pages template
•Template code name: MyCommunitySite.GroupPagesTemplate
•Template category: My Community Site templates
•Template description: some text describing the page template
Click OK. Click Save.
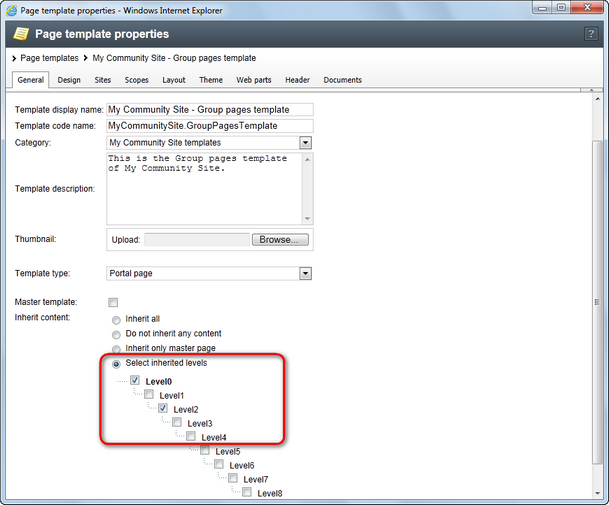
4. Still on the Properties tab, click the Edit template properties link. In the pop-up window, scroll down and change the inheritance so that the page template inherits from Level 0 and Level 2. Click Save in the pop-up window to save the changes and close it.
5. Switch to the Design tab. First, we will add a breadcrumbs heading using the Breadcrumbs web part. Click the Add web part (![]() ) icon of the zoneCenter web part zone and choose the Navigation -> Breadcrumbs web part. Set the following properties of the web part, leave the rest at the default values.
) icon of the zoneCenter web part zone and choose the Navigation -> Breadcrumbs web part. Set the following properties of the web part, leave the rest at the default values.
•Starting path: /{0}/{1}/
•Breadcrumb separator: <span class="TitleBreadCrumbSeparator"> </span>
•Content before:
<div style="padding-left:10px" class="GroupBreadcrumbs"> <a href="~/Groups.aspx" class="CMSBreadCrumbsLink">Groups</a> <span class="TitleBreadCrumbSeparator"> </span> <a href="~/Groups/{%CommunityContext.CurrentGroup.GroupName%}.aspx" class="CMSBreadCrumbsLink">{%CommunityContext.CurrentGroup.GroupDisplayName|(encode)true%}</a> <span class="TitleBreadCrumbSeparator"> </span> |
•Content after: </div>
Click OK.
6. Now we will add a repeater displaying a list of pages of the current group. Click the Add web part (![]() ) icon of the zoneCenter web part zone and choose the Listings and viewers -> Repeater web part. Set the following properties of the web part, leave the rest at the default values.
) icon of the zoneCenter web part zone and choose the Listings and viewers -> Repeater web part. Set the following properties of the web part, leave the rest at the default values.
•Web part control ID: repeaterPages
•Hide on subpages: enabled
•Path: ./Pages/%
•Document types: CMS.SimpleArticle
•Transformation: CMS.SimpleArticle.SimplePreview
•Hide if no record found: disabled
•No record found text: There are currently no pages.
•Web part container: Community Site - Blue Box Light
•Web part container title: Most recent pages
•Content before: <div class="GeneralList">
•Content after: </div>
Click OK.
7. Finally, we will add the Page placeholder in which the page with the particular article will be displayed. Click the Add web part (![]() ) icon of the zoneCenter web part zone and choose the General -> Page placeholder web part. Leave all the properties of the web part at the default values and click OK.
) icon of the zoneCenter web part zone and choose the General -> Page placeholder web part. Leave all the properties of the web part at the default values and click OK.
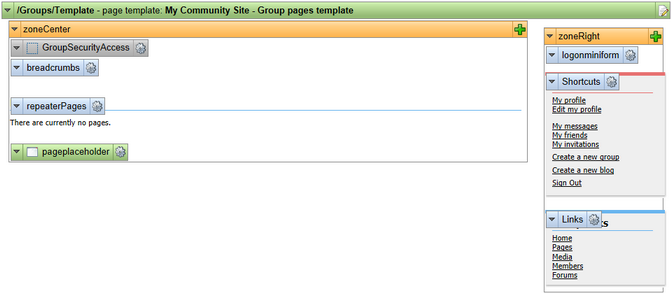
8. The page is now finished. In Design tab, it should look as in the following screenshot.