|
|

Creating the Profile page |

|

|

|

|
|
Creating the Profile page |
|
|

|
|
|
|
Creating the Profile page |
|
|
|
|
|
Creating the Profile page |
|
|
|
|
|
|
||
The Profile page displays a profile of a group besed on the {GroupName} wildcard part of the URL, which gets translated into a query string parameter and is then taken as the current group. More information about wildcard URLs can be found in this chapter of Kentico CMS Developer's Guide.
The profile is displayed using the Group public profile based on the Community.Group.DisplayProfile alternative form. You can learn how to modify the alternative form here.
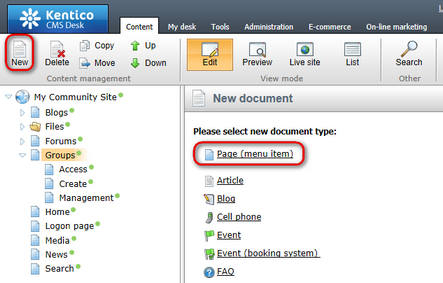
1. Select the Groups page in the content tree and click New. Choose the Page (menu item) document type.
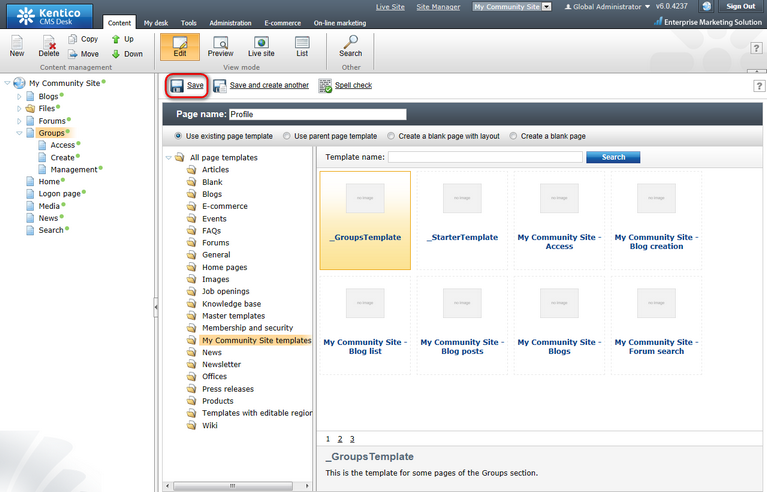
2. Select the My Community Site templates -> _GroupsTemplate created in this chapter. Into the Page name field, enter Profile and click Save.
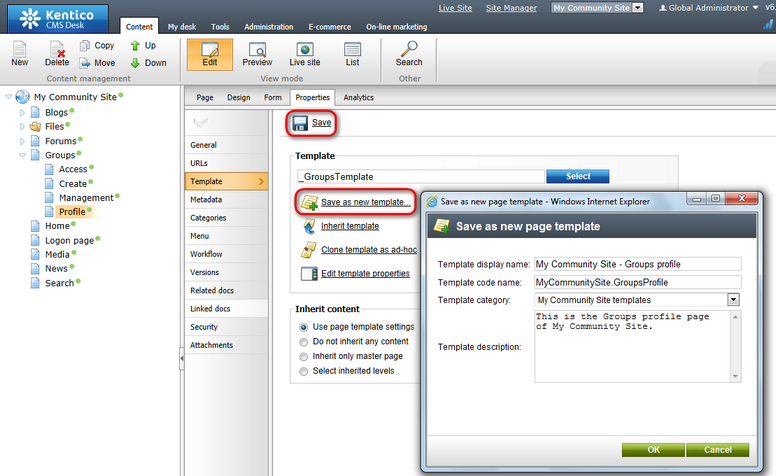
3. Switch to the Properties -> Template tab and click the Save as new template link. Enter the following details in the pop-up dialog:
•Template display name: My Community Site - Groups profile
•Template code name: MyCommunitySite.GroupsProfile
•Template category: My Community Site templates
•Template description: some text describing the page template
Click OK. Click Save.
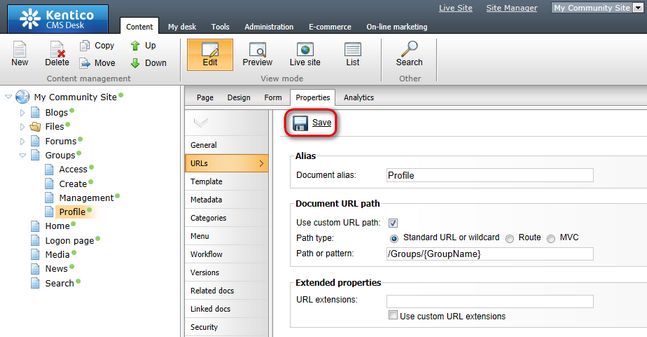
4. Switch to the Properties -> URLs tab. Enter /Groups/{GroupName} into the Document URL path field and click Save.
5. Switch to the Design tab. We will start with zoneRight web part zone. Below the Group links info box, we will add two more info boxes. The first one of them will be displaying the current group's administrators. Click the Add web part (![]() ) icon of the zoneRight web part zone and choose the Community -> Group members viewer web part. Set the following properties of the web part, leave the rest of them at the default values.
) icon of the zoneRight web part zone and choose the Community -> Group members viewer web part. Set the following properties of the web part, leave the rest of them at the default values.
•Web part control ID: GroupMembersAdministrators
•Transformation name: Community.Transformations.MembersPreviewList
•No record found text: There are currently no administrators.
•Show filter: disabled
•WHERE condition:
MemberUserID IN (SELECT UserID FROM CMS_UserRole WHERE RoleID IN (SELECT RoleID FROM CMS_Role WHERE RoleGroupID = '{%CommunityContext.CurrentGroup.GroupID%}' AND RoleIsGroupAdministrator = 1)) |
•Selected columns: UserID,UserNickName,UserGender,UserDateOfBirth,UserAvatarID,UserCreated,UserName, AvatarGuid
•Web part container: Community Site - Red Box
•Web part container title: Group administrators
Click OK.
6. Below the group administrators, we will add the same Group members viewer web part, but this one will be displaying the latest 5 approved members of the group. Click the Add web part (![]() ) icon of the zoneRight web part zone and choose the Community -> Group members viewer web part. Set the following properties of the web part, leave the rest of them at the default values.
) icon of the zoneRight web part zone and choose the Community -> Group members viewer web part. Set the following properties of the web part, leave the rest of them at the default values.
•Transformation name: Community.Transformations.MembersPreviewList
•No record found text: There are currently no members.
•Show filter: disabled
•ORDER BY condition: MemberApprovedWhen DESC
•Select Top N members: 5
•Selected columns: UserID,UserNickName,UserGender,UserDateOfBirth,UserAvatarID,UserCreated,UserName, AvatarGUID
•Web part container: Community Site - Red Box
•Web part container title: Group administrators
Click OK.
7. The zoneRight web part zone is finshed, so let's move to zoneCenter. To the top of the web part zone, we will add a breadcrumbs heading using the Breadcrumbs web part. Click the Add web part (![]() ) icon of the zoneCenter web part zone and choose the Navigation -> Breadcrumbs web part. Set the following properties of the web part, leave the rest of them at the default values.
) icon of the zoneCenter web part zone and choose the Navigation -> Breadcrumbs web part. Set the following properties of the web part, leave the rest of them at the default values.
•Breadcrumb separator: <span class="TitleBreadCrumbSeparator"> </span>
•Content before: <div class="GroupBreadcrumbs">
•Content after: </div>
Click OK.
8. Below the breadcrumbs, we want the group's public profile to be displayed. This can be achieved using the Group public profile web part, which displays the group's public profile based on the specified alternative form. By default, the Community.Group.DisplayProfile alternative form is used. Click the Add web part (![]() ) icon of the zoneCenter web part zone and choose the Community -> Group public profile web part. You do not need to set any properties of the web part. Just use the default values and click OK.
) icon of the zoneCenter web part zone and choose the Community -> Group public profile web part. You do not need to set any properties of the web part. Just use the default values and click OK.
9. Below the Group public profile, we will add a message board where group administrators will be able to leave announcements. Click the Add web part (![]() ) icon of the zoneCenter web part zone and choose the Community -> Group message board web part. Set the following properties of the web part, leave the rest of them at the default values.
) icon of the zoneCenter web part zone and choose the Community -> Group message board web part. Set the following properties of the web part, leave the rest of them at the default values.
•Message transformation: Community.Transformations.MessageBoardComments
•No messages text: There are no announcements at this time
•Display name: Group {%CommunityContext.CurrentGroup.GroupDisplayName|(encode)true%} board
•Access: Only group admin
•Enable subscriptions: enabled
•Board base URL: ~/Groups/Profile.aspx
•Web part container: Community Site - Blue Box Light
•Web part container title: Group announcements
Click OK.
10. Now we will add a Group forum posts viewer. This web part will be set so that it will display the 5 latest posts in the group's forums. Click the Add web part (![]() ) icon of the zoneCenter web part zone and choose the Community -> Group forum posts viewer web part. Set the following properties of the web part, leave the rest of them at the default values.
) icon of the zoneCenter web part zone and choose the Community -> Group forum posts viewer web part. Set the following properties of the web part, leave the rest of them at the default values.
•Transformation name: Community.Transformations.ForumGroupPostsList
•Top N: 5
•Order by: PostTime DESC
•Selected columns: PostIDPath,PostForumID,PostText,PostTime,PostSubject
•Hide if no record found: disalbed
•No record found text: There are currently no posts.
•Web part container: Community Site - Blue Box Light
•Web part container title: Latest in forums
Click OK.
11. The last web part on the page will be a Repeater displaying articles in the Group pages section. Click the Add web part (![]() ) icon of the zoneCenter web part zone and choose the Listings and viewers -> Repeater web part. Set the following properties of the web part, leave the rest of them at the default values.
) icon of the zoneCenter web part zone and choose the Listings and viewers -> Repeater web part. Set the following properties of the web part, leave the rest of them at the default values.
•Web part control ID: MostRecentPages
•Path: /Group-pages/{%CommunityContext.CurrentGroup.GroupName%}/Pages/%
•Document types: CMS.SimpleArticle
•ORDER BY expression: DocumentCreatedWhen DESC
•Transformation: CMS.SimpleArticle.SimplePreview
•Selected item transformation: CMS.SimpleArticle.Default
•Hide if no record found: disabled
•No record found text: There are currently no pages.
•Web part container: Community Site - Blue Box Light
•Web part container title: Most recent pages
•Content before: <div class="GeneralList">
•Content after: </div>
Click OK.
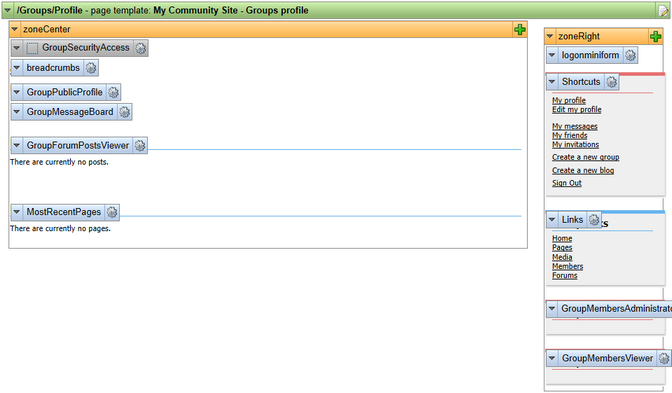
12. The page is now finished. In Design tab, it should look as in the following screenshot.