|
Defining web farm servers |

|

|

|

|
|
Defining web farm servers |
|
|
|
|
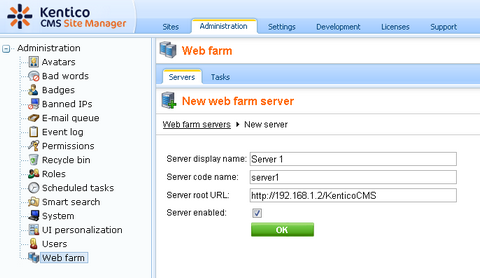
You need to enter the internal URLs of all your servers into the system so that the web farm synchronization module knows which servers should be synchronized.
Go to Site Manager -> Administration -> Web farm and click ![]() New server, enter the values:
New server, enter the values:
| • | Server display name: some descriptive name displayed to the users |
| • | Server code name: code name of the server that will be used in the server's configuration file |
| • | Server root URL: the URL of the root of the website, such as http://192.168.1.2/KenticoCMS |
Click OK to save and repeat the process for every server in your web farm.
Now you need to update the web.config file on each server and add the following keys into the /configuration/appSettings section:
<add key="CMSWebFarmServerName" value="server1"/> <add key="CMSWebFarmEnabled" value="true"/> |
Where server1 is the appropriate code name of the given server. Every server must contain only one such key with its own name.
Additional low-level settings of web farm synchronization can be done by adding the keys listed in the Web farm synchronization settings section of Appendix C - Web.config parameters into the /configuration/appSettings section of your web.config file.
If the synchronization doesn't work as expected, you can check the failed synchronization tasks on the Tasks tab. Processed tasks are automatically removed from the list and failed tasks are displayed with an error message.
|
License keys
Please be sure to enter an appropriate license key for the internal URL of the server.
E.g. if the web farm servers are used for domain name example.com and you access them internally through URLs like http://192.168.1.2, http://192.168.1.3, etc., you need to enter separate license keys for example.com, 192.168.1.2 and 192.168.1.3 in Site Manager -> Licenses dialog (you need to do that on one server only and restart the other instances using Site Manager -> Administration -> System -> Restart application). |
Configuring the server synchronization interval
By default, web farm servers are updated with changes made on other servers once per request. Synchronizing this frequently may however be impractical for high‑traffic websites. The synchronization interval can be changed by setting the value of the CMSWebFarmUpdateWithinRequest web.config key to false and using the Synchronize web farm changes scheduled task instead, which has a configurable execution interval. To do this, go to Site Manager -> Administration -> Scheduled tasks, select (global) from the Site drop-down list at the top of the page, edit (![]() ) the mentioned task, set the required Task interval, check the Task enabled property and click OK.
) the mentioned task, set the required Task interval, check the Task enabled property and click OK.
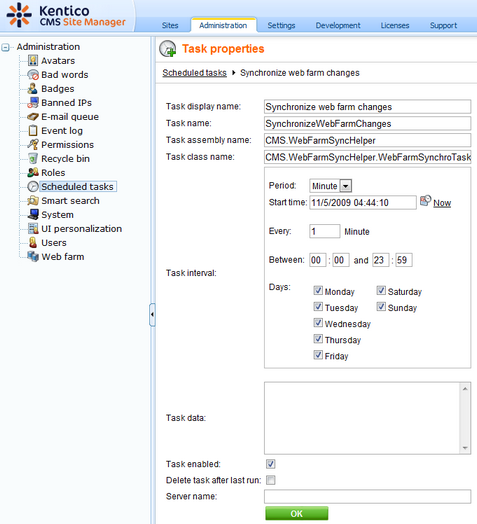
The task must also be created for each server in the web farm, so return to the list of scheduled tasks, click the ![]() New task link, fill in the same properties as those of the Synchronize web farm changes task (the Task name must be different) and check the Create tasks for all web farm servers box below the Server name property. Click OK to complete the process.
New task link, fill in the same properties as those of the Synchronize web farm changes task (the Task name must be different) and check the Create tasks for all web farm servers box below the Server name property. Click OK to complete the process.
Page url: http://devnet.kentico.com/docs/5_5r2/devguide/index.html?defining_web_farm_servers.htm


