|
Creating a static newsletter |

|

|

|

|
|
Creating a static newsletter |
|
|
|
|
In this topic, you will learn how to create a static newsletter:
1. Go to CMS Desk -> Tools -> Newsletter and click ![]() New newsletter. Enter the following details:
New newsletter. Enter the following details:
| • | Newsletter display name: My newsletter (this is the name displayed to the users) |
| • | Newsletter name: MyNewsletter (this is the code name used in web parts and code) |
| • | Subscription confirmation: Subscription confirmation template |
| • | Unsubscription confirmation: Unsubscription confirmation template |
| • | Sender name: enter your full name |
| • | Sender e-mail: enter your e-mail address |
Choose Template based newsletter and use the Newsletter issue template. Click OK. The following three additional options can now be entered:
| • | Base URL: the base URL of your website used to convert relative links to absolute; It's necessary to set this property in order for the unsubscription links to work properly. It's also useful if you encounter any issues with links in newsletter e-mails - e.g. if you're using a different URL for your editing environment than for the live website. Example: https://www.example.com |
| • | Unsubscription page URL: ~/SpecialPages/Unsubscribe.aspx (the page with a Newsletter unsubscription web part) |
| • | Send issues via e-mail queue: if enabled, newsletter issues are sent to the SMTP server via the E-mail queue; this is recommended for newsletters with a large number of recipients; if disabled, the issues are sent directly to the SMTP server |
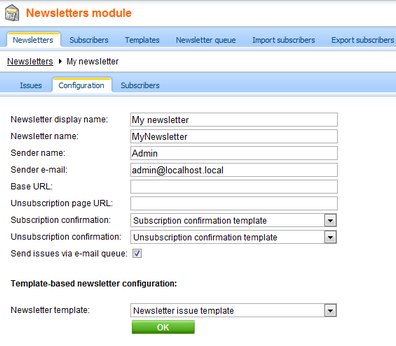
Click OK.
2. Now we will create a new subscriber. Go to the main Subscribers tab (in the top tab menu) and click ![]() New subscriber. Enter the following details:
New subscriber. Enter the following details:
| • | E-mail: subscriber's e-mail address |
| • | First name: subscriber's first name |
| • | Last name: subscriber's last name |
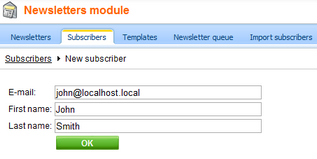
Click OK. The subscriber has been created. Now we will assign this subscriber to our previously created newsletter.
3. Go to the Subscriptions tab, click the Add newsletters button, check the My newsletter checkbox and click OK.
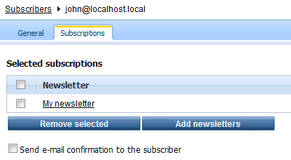
If you check the Send e-mail confirmation to the subscriber checkbox, the subscriber will also receive an e-mail confirmation informing them of their subscription.
4. Your newsletter is configured. You can now create new issues as is described in the Authoring static newsletter issues topic.
Page url: http://devnet.kentico.com/docs/5_5r2/devguide/index.html?creating_a_static_newsletter.htm

