|
Configuring multilingual and RTL UI |

|

|

|

|
|
Configuring multilingual and RTL UI |
|
|
|
|
Kentico CMS allows you to manage content in any language, including double-byte (eastern) languages, such as Chinese, and right-to-left languages (such as Hebrew or Arabic). All content is stored and published in UNICODE.
Translating the administration interface
If you want the administration interface to be displayed in a different language or at least with different culture settings (e.g. calendar and numeric format), go to Site Manager -> Development -> UI cultures and create a new UI culture:
| • | UI culture name: Hebrew (example - you can use any other culture) |
| • | UI culture code: he-IL (example - you can use any other culture code) |
Click OK.
Now create a copy of file <web project>\CMSResources\cms.resx under name cms.he-IL.resx (generally cms.<culture code>.resx) in the same folder and translate the strings.
Please note: when you make changes to the .resx file, you need to restart the web application using the Site Manager -> Administration -> System -> Restart application button so that the changes are updated in the user interface.
Modifying standard strings
If you want to modify some text in the user interface (including web parts), you can create a custom.resx file and put your strings to this file. The name of the string must be the same as in the cms.resx file. This procedure allows you to modify the strings without worrying that your changes will be overwritten during an upgrade to a newer version.
If you need to customize strings in non-english resource file, your custom file must use a name like custom.fr-fr.resx for French.
How to add your own strings
If you need to translate your own website strings, such as form labels or other static text into several languages, you can create custom string in Site Manager -> Development -> UI cultures either in English or only in some specific language. Please be sure to check the Custom string box in this case so that the string is automatically exported with your website.
Then, you can retrieve the string using the CMS.GlobalHelper.ResHelper.GetString method in your custom code.
Please see chapter Localization Expressions to see how you can insert localized strings into text values throughout the CMS.
|
Priority of the resource strings
When looking for a localized strings, the system uses the following priority:
It means if there are duplicate strings with same name in all three files, the system will use the one stored in the database.
To change the priorities, you can add the following key to your web.config:
When the key is added, the priorities are the following:
|
Applying selected culture to the user interface
Now if you want to view the user interface in a different culture, you need to go to Site Manager -> Administration -> Users -> edit your user profile and set the Preferred user interface culture to the required value:
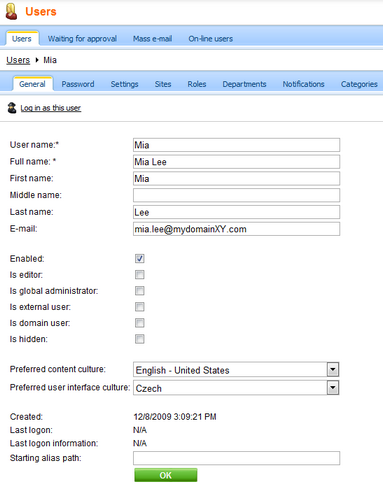
When you sign out and sign in again, the user interface is displayed with the new culture settings and translated strings (after you translate them):
Page url: http://devnet.kentico.com/docs/5_5r2/devguide/index.html?configuring_multilingual_ui.htm


