In this topics, we will create a new sample BizForm via the BizForms module's user interface. This topic doesn't explain all options that are available in the user interface. For a detailed description of each option, please refer to the built-in context help, which is accessible by clicking the  icon in the top-right corner of the user interface.
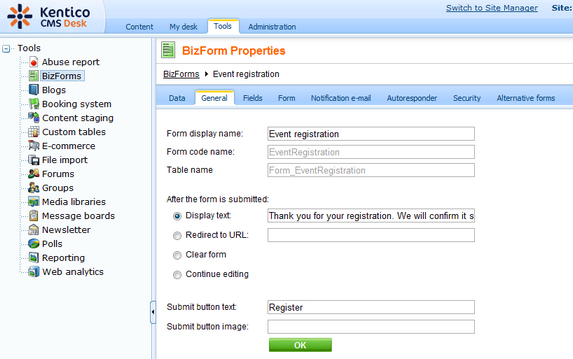
1. Go to CMS Desk -> Tools -> BizForms and click the  New form link. Enter the following details:
| • | Form display name: Event registration |
| • | Form code name: EventRegistration |
| • | Table name: Form_EventRegistration |
Click OK.
2. You will be redirected to the General tab of the new BizForm's editing interface. Enter the following values:
| • | Display text: Thank you for your registration. We will confirm it shortly by e-mail. |
| • | Submit button text: Register |
Click OK.
3. Now we will define the form fields. Go to the Fields tab. Add the following fields using the Add attribute ( ) button. For each field, enter the values, click OK and repeat the procedure until you have all the listed fields defined.
| • | Show on public form: enabled |
| • | Field caption: First name |
| • | Allow empty value: disabled |
| • | Show on public form: enabled |
| • | Field caption: Last name |
| • | Allow empty value: disabled |
| • | Show on public form: enabled |
| • | Field type: U.S. phone number |
| • | Allow empty value: enabled |
| • | Show on public form: enabled |
| • | Allow empty value: disabled |
| • | Column name: Presentations |
| • | Show on public form: enabled |
| • | Field caption: Presentations you want to visit |
| • | Field type: Multiple choice |
| • | Options: ASP.NET;ASP.NET |
ATLAS;ATLAS
WPF;Windows Presentation Foundation
| • | Allow empty value: enabled |
4. The last item will be used only by site editors to mark the processed registration forms. This will be done exclusively via the user interface. Therefore, it has the Show on public form property disabled.
| • | Column name: RegistrationProcessed |
| • | Show on public form: disabled |
| • | Field caption: Registration processed |
| • | Allow empty value: enabled |
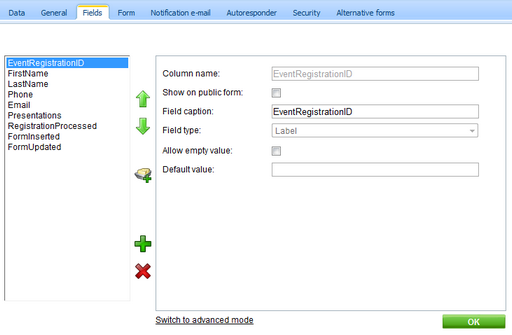
5. With all the fields defined, the form is ready to be published on the live site. This can be done several different ways, all of which are described in the Displaying a form on the live site topic.

|
Please note
If you click the Switch to advanced mode link below the field editor, extended user interface will be displayed. There you can configure additional options such as input validation rules or CSS classes used for the fields.
|
Page url:
http://devnet.kentico.com/docs/5_5r2/devguide/index.html?creating_a_new_bizform.htm


