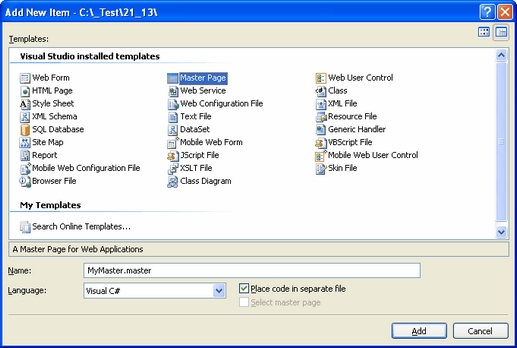
Open the web project in Visual Studio and righ-click the CMSTemplates folder in the Solution Explorer window and create a new sub-folder MySite. Please note that the folder name must be same as the code name of your site.
Right-click the MySite folder and choose Add new item... Choose to create a new master page and set its name to MyMaster.master. If you're a VB developer, you may want to choose Visual Basic in the Language drop-down list.

Replace all default ASPX code from the master page (in the Source view) except of the first line with <%@ Master %> directive with the following code:
<%@ Register Assembly="CMS.PortalControls" Namespace="CMS.PortalControls" TagPrefix="cc2" %> <%@ Register Assembly="CMS.Controls" Namespace="CMS.Controls" TagPrefix="cc1" %> <%=DocType%> <html xmlns="http://www.w3.org/1999/xhtml"> <head id="Head1" runat="server"> <asp:literal runat="server" id="ltlTags" enableviewstate="false" /> </head> <body class="<%=BodyClass%>" <%=BodyParameters%>> <form id="form1" runat="server"> <cc1:CMSPageManager ID="CMSPageManager1" runat="server" /> </form> </body> </html> |
The CMSPageManager control ensures loading of content from the database into the page.
In case that you are planning to use AJAX components on your site, you need to add the ScriptManager control after the CMSPageManager control.
<asp:ScriptManager ID="manScript" runat="server" /> |
Switch to code behind and add the reference to the CMS.UIControls namespace:
[C#]
using CMS.UIControls; |
[VB.NET]
Imports CMS.UIControls |
Change the class definition so that the master page inherits from TemplateMasterPage:
[C#]
public partial class CMSTemplates_MySite_MyMaster : TemplateMasterPage |
[VB.NET]
Partial Class CMSTemplates_MySite_MyMaster Inherits TemplateMasterPage |
Add the following code after the Page_Load method and call both the CreateChildControls and the OnPreRender methods from the Page_Load method:
[C#]
protected override void CreateChildControls() { base.CreateChildControls();
this.PageManager = this.CMSPageManager1; }
protected override void OnPreRender(EventArgs e) { base.OnPreRender(e);
this.ltlTags.Text = this.HeaderTags; } |
[VB.NET]
Protected Overloads Overrides Sub CreateChildControls() MyBase.CreateChildControls()
Me.PageManager = Me.CMSPageManager1 End Sub
Protected Overloads Overrides Sub OnPreRender(ByVal e As EventArgs) MyBase.OnPreRender(e)
Me.ltlTags.Text = Me.HeaderTags End Sub |
Now switch to the Source mode (HTML mode) copy and paste the HTML code from the sample home.htm file (inside <body></body> tags) after the <cc1:CMSPageManager /> control in the master page.
However, we need only the logo, main menu and footer. So we will replace the <!-- main content --> ... <!-- /main content --> section of the HTML code with the following code:
<asp:ContentPlaceHolder ID="plcMain" runat="server"></asp:ContentPlaceHolder> |
This is a standard ASP.NET control that ensures loading of pages into the master page.
So the added code will look like this:
<div class="MainDiv">
<!-- logo --> <br /> <div class="Logo"> </div>
<!-- main menu --> <div class="MainMenu"> <table cellspacing="2" cellpadding="2" border="0"> <tr> <td class="MainCMSMenuHighlightedMenuItem">Home</td> <td class="MainCMSMenuItem">Page 1</td> </tr> </table> </div>
<!-- main content --> <asp:ContentPlaceHolder ID="plcMain" runat="server"></asp:ContentPlaceHolder> <!-- /main content -->
<!-- footer --> <div class="Footer"> This is a sample web site for Kentico CMS </div>
</div> |
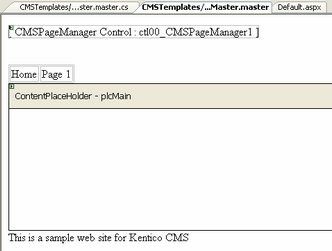
When you switch to the Design tab, you should see a page preview like this:

Save the changes.
|
Using CSS-based layout instead of tables
If you prefer using CSS-based layout, you can easily change the HTML code here and replace the tables with DIV elements. We use table-based layout by default since it's easier to understand, although we are aware of advantages of the CSS-based layout. |
