Integrating Azure Search with Kentico
Microsoft continues to expand its cloud platform with new functionality to meet the growing needs of business. Azure Search is one of the latest offerings that can provide a robust and scalable search option for applications. I wanted to see how well this search feature integrated with Kentico, so I decided to develop a prototype using this new service. In this blog, I’ll show you how to combine these two great products to provide a powerful search platform to your application.
This blog has been updated! Check out the details below.
Overview
Azure Search is a powerful feature of Microsoft’s cloud platform that provides a scalable, full-text search via a REST API. This functionality abstracts the search processing from your application and offloads it to the cloud, with all communication done via the API. The data for the index is provided by the client and stored in Azure, where Microsoft indexes and searches against it. Unlike traditional “fetch” services that access your data externally, Azure Search requires that developers upload their data to Azure to store in the cloud.
One of the best parts of the service is the ability to leverage machine-learning for better results. Using cloud-based resources, Azure Search allows for filtering, sorting, scoring, and support for fifty different languages. Through highlighting and faceting, results can be customized to display the exact information the user is searching for in a clean, logical format.
You can find out more about Azure Search here:
https://msdn.microsoft.com/en-us/library/azure/dn798933.aspx
In this blog, I will be leveraging this API to build a custom search component to my site using an Azure Search Service. I will show you how to create an index, upload data to it, and then perform search functions against it. In the end, I will have a completely abstracted search feature for my application, hosted in the cloud.
Setting up the service
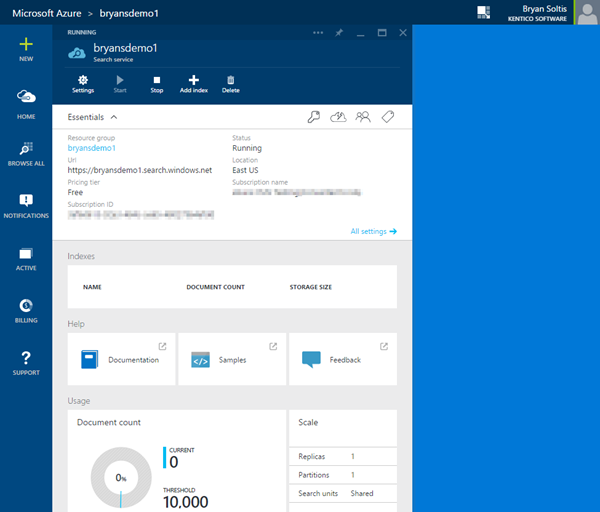
The first step of the process is to create my Azure Search Service. This is a simple process that involves a few clicks within the Azure Management Portal to get running.
You can find tutorials for this process here:
https://azure.microsoft.com/en-us/documentation/articles/search-get-started-dotnet/
Azure Search is currently divided into two pricing tiers. I have chosen the Free pricing tier as this is a demo site. For a production site with more than 10,000 documents, you will need to choose the Standard pricing, which will allocate specific resources for your search and offer additional scaling capabilities.
Creating my web part
For my example, I made a single web part that will handle all of my integration. In this control, I will allow the user to create an index, load the index with data, and search against it. All of the processes will be manual and allow me to view each result as they occur.
Note
This implementation, as you can imagine, isn’t exactly a real-world solution but rather a quick POC for testing purposes. At the end of the article, I will detail the areas a full-scale solution should contain.
I start with a basic web part and add a few properties. These properties will be related to my Azure Search Service and allow me to configure a different service and index for each implementation of the web part.
#region "Public properties"

    /// <summary>
    /// Gets or sets azure search service name
    /// </summary>
    public string AzureSearchServiceName
    {
        get
        {
            return ValidationHelper.GetString(GetValue("AzureSearchServiceName"), "");
        }
        set
        {
            SetValue("AzureSearchServiceName", value);
        }
    }

    /// <summary>
    /// Gets or sets azure search service key
    /// </summary>
    public string AzureSearchServiceKey
    {
        get
        {
            return ValidationHelper.GetString(GetValue("AzureSearchServiceKey"), "");
        }
        set
        {
            SetValue("AzureSearchServiceKey", value);
        }
    }

    /// <summary>
    /// Gets or sets azure search service key
    /// </summary>
    public string AzureSearchServiceIndexName
    {
        get
        {
            return ValidationHelper.GetString(GetValue("AzureSearchServiceIndexName"), "");
        }
        set
        {
            SetValue("AzureSearchServiceIndexName", value);
        }
    }

    #endregion
For the design, I have added some basic controls to allow the user to perform the actions and see the results.
<h2>Azure Search</h2>
<asp:UpdateProgress ID="upp1" runat="server" AssociatedUpdatePanelID="up1">
    <ProgressTemplate>
        Working....
    </ProgressTemplate>
</asp:UpdateProgress>
<asp:UpdatePanel ID="up1" runat="server">
    <ContentTemplate>
        <h3>Index Actions</h3>
        <asp:Button ID="btnCreateIndex" runat="server" Text="Create Index" CssClass="btn btn-primary" OnClick="bt_Click" />
        <asp:Button ID="btnLoadIndex" runat="server" Text="Load Index"  CssClass="btn btn-primary" OnClick="bt_Click" />
        <h3>Search</h3>
        <asp:TextBox ID="txtSearch" runat="server"></asp:TextBox>
        <br />
        <br />
        <asp:Button ID="btnSearch" runat="server" Text="Search" OnClick="bt_Click"  CssClass="btn btn-primary" />
        <asp:Button ID="btnReset" runat="server" Text="Reset" OnClick="bt_Click"  CssClass="btn btn-primary" />
        <br />
        <br />
        <asp:Label ID="lblResults" runat="server"></asp:Label>
    </ContentTemplate>
</asp:UpdatePanel>
One last setup piece was to create a helper class to store my Azure calls. This made things much cleaner and easier to manage.
public class AzureSearchHelper
{
    public const string ApiVersionString = "api-version=2014-07-31-Preview";

    private static readonly JsonSerializerSettings _jsonSettings;

    static AzureSearchHelper()
    {
        _jsonSettings = new JsonSerializerSettings
        {
            Formatting = Formatting.Indented, // for readability, change to None for compactness
            ContractResolver = new CamelCasePropertyNamesContractResolver(),
            DateTimeZoneHandling = DateTimeZoneHandling.Utc
        };

        _jsonSettings.Converters.Add(new StringEnumConverter());
    }

    ......
Creating the index
Now that I have my web part created, it’s time to add the good stuff! The first piece is the logic to create the search index. This code consists of a simple REST API call to create the index using the web part property values.
/// <summary>
    /// This function will create the specified index.
    /// </summary>
    /// <returns>string - Results response</returns>
    private string CreateCatalogIndex()
    {
        try
        {
            var definition = new
            {
                Name = this.AzureSearchServiceIndexName,
                Fields = new[]
                {
                    new { Name = "DocumentID",Type = "Edm.String",Key = true,  Searchable = false, Filterable = false, Sortable = false, Facetable = false, Retrievable = true,  Suggestions = false },
                    new { Name = "DocumentName",Type = "Edm.String",Key = false, Searchable = true,  Filterable = false, Sortable = true,  Facetable = false, Retrievable = true,  Suggestions = true  }
                }
            };

            Uri uri = new Uri(_serviceUri, "/indexes");
            string json = AzureSearchHelper.SerializeJson(definition);
            HttpResponseMessage response = AzureSearchHelper.SendSearchRequest(_httpClient, HttpMethod.Post, uri, json);
            response.EnsureSuccessStatusCode();
            return "Index created.";
        }
        catch(Exception ex)
        {
            return "Index not created.<br />" + ex.Message;
        }
    }
In this code, I am defining the structure of the index, as well as defining specific attributes on the fields. Each field of the index can have a number of attributes, each affecting how the service handles data in that field. For my example, I am only indexing the DocumentID (to act as a unique ID for the records) and the DocumentName fields.
You can find additional details on the index attributes.
https://msdn.microsoft.com/en-us/library/azure/dn798941.aspx
Note that I am checking if the index exists before I attempt to create it. This will prevent us from having redundant data in our service.
case "btnCreateIndex": //Create the index in Azure Saerch
                    Uri uri = new Uri(_serviceUri, "/indexes/" + this.AzureSearchServiceIndexName);
                    HttpResponseMessage response = AzureSearchHelper.SendSearchRequest(_httpClient, HttpMethod.Get, uri);
                    if (response.StatusCode == HttpStatusCode.NotFound)
                    {
                        CreateCatalogIndex();
                        sb.Append("Index created!");
                    }
                    else
                    {
                        sb.Append("Index exists!");
                    }
Loading the index
The next important piece of code is to load the data into the index. For this example, I am choosing to add all of my site pages to the index to allow searching of pages by name. I accomplish this by using the DocumentQuery API to pull my site documents. From there, I build my JSON string to post to the Azure Search REST service.
private string LoadIndex()
    {
        try
        {
            // Get documents
            var documents = DocumentHelper.GetDocuments()
                .Types("CMS.MenuItem", "CMS.Folder")
                .OnSite(CurrentSiteName);

            StringBuilder sb = new StringBuilder();

            sb.Append("{");
            sb.Append("\"value\": [");
            int i = 1;
            foreach (var document in documents)
            {
                sb.Append("{");
                sb.Append("\"@search.action\":\"mergeOrUpload\",");
                sb.Append("\"DocumentID\":\"" + document.DocumentID + "\",");
                sb.Append("\"DocumentName\":\"" + document.DocumentName + "\"");
                sb.Append("}");
                if (i < documents.Count)
                {
                    sb.Append(",");
                }
                i += 1;
            }
            sb.Append("]");
            sb.Append("}");

            Uri uri = new Uri(_serviceUri, "/indexes/" + this.AzureSearchServiceIndexName + "/docs/index");
            string json = sb.ToString();
            HttpResponseMessage response = AzureSearchHelper.SendSearchRequest(_httpClient, HttpMethod.Post, uri, json);
            response.EnsureSuccessStatusCode();

            return "Index data loaded";
        }
        catch (Exception ex)
        {
            return "Index data not created.<br />" + ex.Message;
        }
    }
Because I created the index with the DocumentID field marked as the Key field, the service will treat this as the unique identifier for the index. When I load the data, I am passing the DocumentID for each record. The service will use this to add or insert the data, depending on what is currently in the index. This is a nice feature to prevent duplicate records from being stored.
Note
Loading the index data is extremely customizable, and you can choose what data to add to the service. If you want to replace completely Kentico’s built-in search, this will require a good bit of development on the index creation/loading to be sure you are indexing the correct data.
Searching the index
The final piece of functionality to add is the search integration. This code will execute a call to the REST API, passing the entered values and returning the results. For the returned values, I am using the DocumentHelper API to get the document URL to display.
private string SearchIndex(string strValue)
    {
        StringBuilder sb = new StringBuilder();
        try
        {
            //Build up the search parameter
            string search = "&search=" + Uri.EscapeDataString(strValue);

            //Get the Azure Search records for the specified value
            if (strValue.Length > 2)
            {
                Uri uri = new Uri(_serviceUri, "/indexes/" + this.AzureSearchServiceIndexName + "/docs/suggest?$count=true" + search);
                HttpResponseMessage response = AzureSearchHelper.SendSearchRequest(_httpClient, HttpMethod.Get, uri);
                AzureSearchHelper.EnsureSuccessfulSearchResponse(response);

                dynamic results = AzureSearchHelper.DeserializeJson<dynamic>(response.Content.ReadAsStringAsync().Result);

                //Create a list of the results so we can loop over them and find the assoicated document
                IEnumerable<AzureResultItem> items = ((JArray)results["value"]).Select(x => new AzureResultItem
                {
                    documentid = (string)x["DocumentID"],
                    documentname = (string)x["@search.text"]
                }).ToList();

                foreach (AzureResultItem item in items)
                {
                    sb.Append(item.documentname + "<br />");
                    var doc = DocumentHelper.GetDocument(ValidationHelper.GetInteger(item.documentid, 0), null);
                    sb.Append("<a href=\"~" + doc.NodeAliasPath + "\">" + doc.NodeAliasPath + "</a><br /><br />");
                }
            }
            else
            {
                sb.Append("You must enter atleast 3 characters.");
            }
        }
        catch(Exception ex)
        {
            sb.Append(ex.Message);
        }
        return sb.ToString();

    }
Much like the creation and loading of the index, the search API is a very dynamic piece of code and can accept several parameters that affect the results. Notice that, in my example, I am performing a “suggest” call (noted in the Uri). This code will find all of the records that start with the entered value and return them. The Suggest functionality is nice for finding things like the search term but does require at least three characters to be entered.
Uri uri = new Uri(_serviceUri, "/indexes/" + this.AzureSearchServiceIndexName + "/docs/suggest?$count=true" + search);
               HttpResponseMessage response = AzureSearchHelper.SendSearchRequest(_httpClient, HttpMethod.Get, uri);
               AzureSearchHelper.EnsureSuccessfulSearchResponse(response);
There are several ways to execute the search query, each with different capabilities and results. You can find more about the available API calls here:
https://msdn.microsoft.com/en-us/library/azure/dn798927.aspx
Testing it out
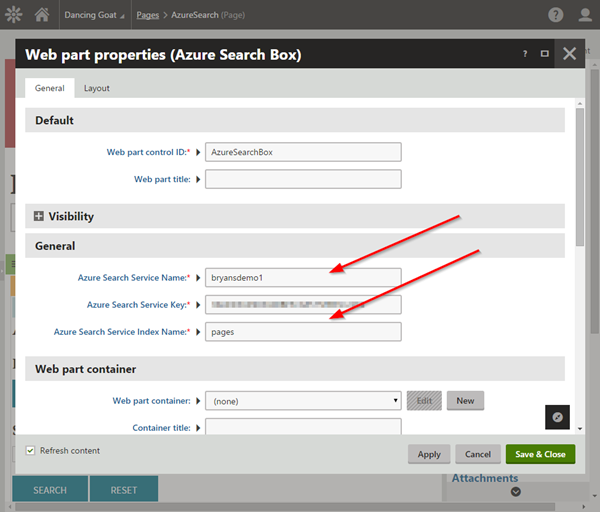
Now that I have my functionality in place, it’s time to see if it actually works! The first step will need to be adding the web part to my site and setting the Azure Search Service properties.
Web Part Properties
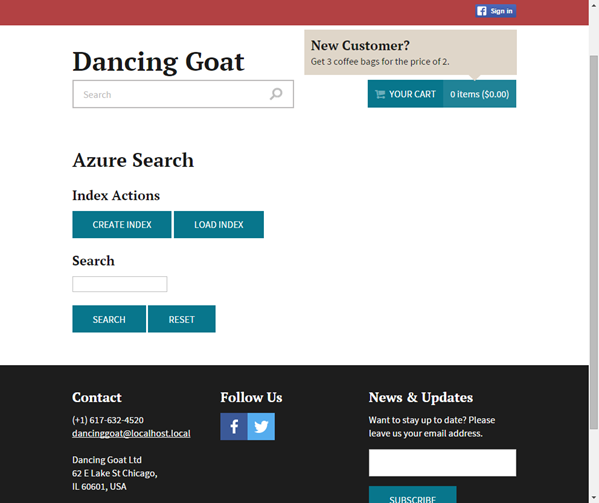
Web Part Display
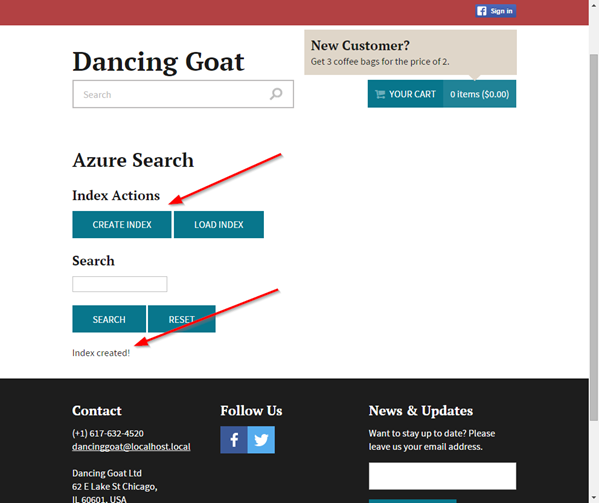
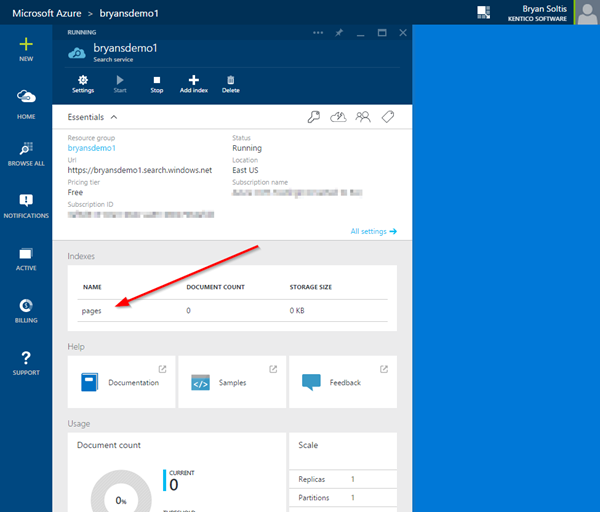
Next, I will view the page and create my index. I will verify the index is created in my Azure Search service.
Create Index 1
Create Index 2
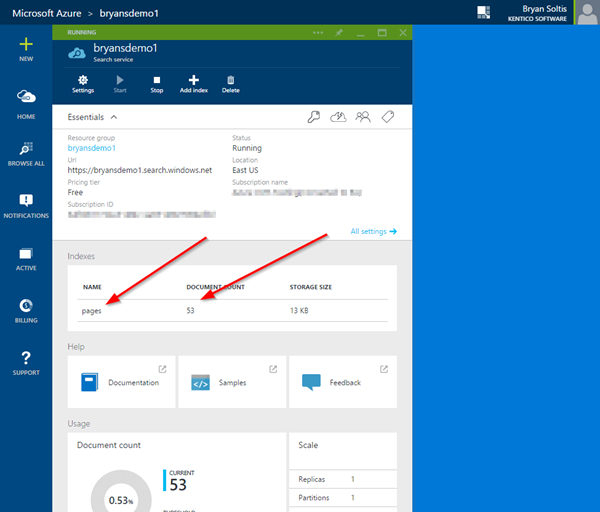
After creating the index, it’s time to load the data.
Load Index 1
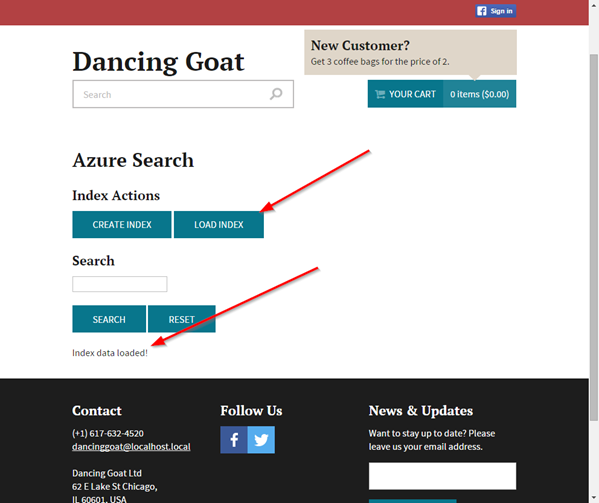
Load Index 2
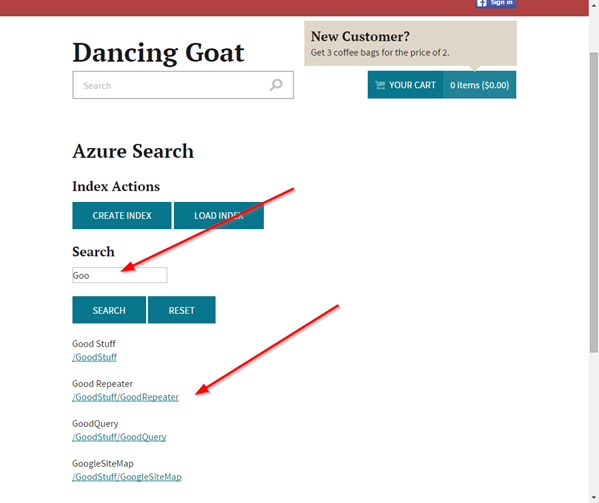
With the index data loaded, I can now perform searches against the data.
Search Index 1
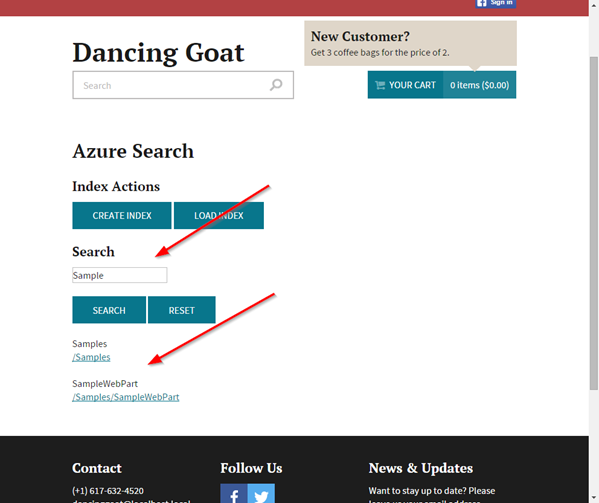
Search Index 2
Moving Forward
I wrote this blog to show you some possibilities with integrating Azure Search into your Kentico sites. Due to the complexities of building a robust search solution, I opted for a simple implementation with some basic functionality. If I were to build a full solution, I would probably develop the following:
- Create a custom module for managing the indexes within my Kentico site
- Add a UI to allow the user to define the page types to index
- Add a UI to allow the user to define the page type fields to index
- Add a UI to allow the user to define how each file would be indexed/configured
- Add functionality to keep the index up to date as data changes within the site (Global event handler, Scheduled task, etc.)
- Enhance the web part to allow the user to specify their search criteria
- Enhance the web part to allow the user to define a transformation for the results
As you can see, a full implementation would be a daunting task, but one that may prove worth it for certain projects. Search can be a very resource-intensive process and impede a site’s ability to stand up to traffic. Integrating with a 3rd party service like Azure Search may alleviate these issues by offloading this processing to the cloud. Additionally, a cloud-based solution would allow for scalability and growth as needs change within the application.
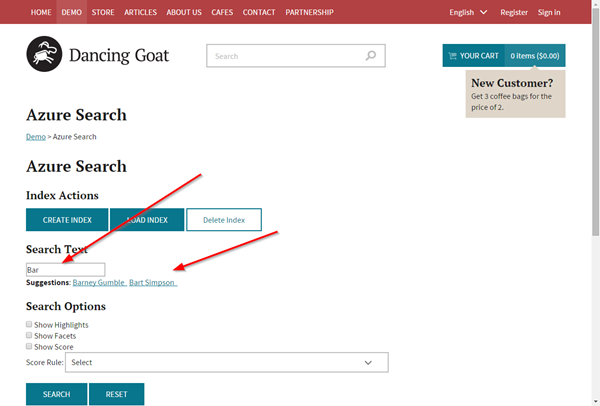
UPDATE
I aded some new functionality to the web part to enable type-ahead suggestions. It's not the most elegant implementation (a classy AJAX postback), but you should see the concept in action. Basically, as you type in the Search Box, it will look at the QuoteAuthor field and return any matching values. Clicking on the suggestion will post back the value and return the results.
You can download the updated version below.
Conclusion
I really enjoyed working on this blog and seeing how it can be used with Kentico. Because both Kentico and Azure are so extendable, the integration proved to be pretty easy and definitely achievable for most developers. I’d be interested to know your thoughts and experiences with Azure Search.
And here’s the web part code and helper class code.
Download Azure Search Source Code
This blog is intended to demonstrate one of many ways to accomplish this task. Always consult the Kentico Documentation for best practices and additional examples.