HTML minification with WebMarkupMin
In this article, you will learn how to implement minification of the HTML output in Kentico using the open source .NET library WebMarkupMin. Thanks to a custom module you can control what exactly you want to minify directly from the administration interface.
Output minification is a very good way how to improve your page load times – by removing unnecessary content and re-formatting the code it helps you to decrease the amount of transferred data from your server to the client browser without affecting the layout or the functionality of the website.
Kentico already includes a built-in mechanism to minify CSS and Javascript files, which you can enable in the Performance section of the Settings application in the administration interface. This can significantly improve the performance in case of most of the websites. However, your site can be designed in a way that it produces longer HTML output, which also includes embedded HTML and JavaScript code. Let’s take a look at how you can minify this output and further improve the load time of your pages.
Because the number of different elements an HTML code can contain, the embedded and inline styles and JavaScript code, minifying an HTML code safely can be a very difficult task. We are not going to re-invent the wheel and develop our custom algorithm – fortunately someone already did all the hard work and we will use a free, open source .NET library called WebMarkupMin. In the following examples, we will work with WebMarkupMin version 2.2.3.
Installing the WebMarkupMin NuGet package
The first step we need to do is to install the WebMarkupMin library to our Kentico solution. Conveniently, it’s available as a NuGet package, so Visual Studio will do most of the work for us. I’m sure many of you already know how to do this even with closed eyes when someone wakes you up at 3 a.m., but let’s remind it for everyone:
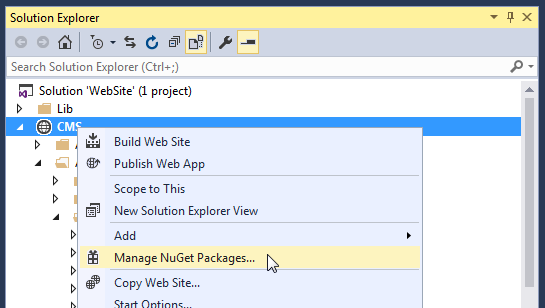
1. Open the Kentico Solution in Visual Studio
2. Right-click on the solution in Solution Explorer and select Manage NuGet packages…
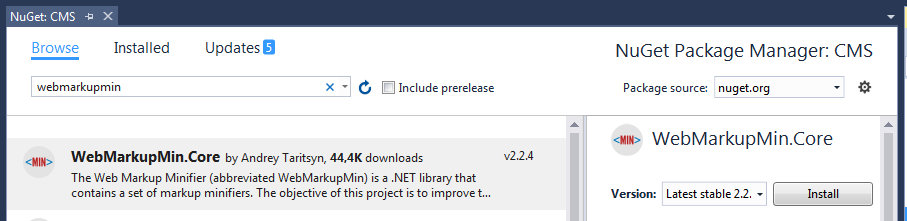
3. Search for “webmarkupmin” and Install the WebMarkupMin.Core package
Option 1: Creating a custom output filter
Now that we installed WebMarkupMin, we need to create a custom output filter, which will process the HTML output on each page request. This code will be executed after all other output filtering is finished by Kentico, so we won’t affect the out of the box filters. We will hook up our code to the RequestEvents.PostMapRequestHandler.Execute event.
The most basic implementation without any settings will look like this – implemented in a .cs file in the App_Code folder:
using System;
using CMS.OutputFilter;
using CMS.Helpers;
using CMS.Base;
using WebMarkupMin.Core;

[CustomOutputFilter]
public partial class CMSModuleLoader
{
    /// <summary>
    /// Registers the module
    /// </summary>
    private class BasicHtmlFilter : CMSLoaderAttribute
    {
        /// <summary>
        /// Initializes the module
        /// </summary>
        public override void Init()
        {
            // Ensures that the output filter instance is created on every request
            RequestEvents.PostMapRequestHandler.Execute += PostMapRequestHandler_Execute;
        }

        private void PostMapRequestHandler_Execute(object sender, EventArgs e)
        {
            // Creates an output filter instance
            ResponseOutputFilter.EnsureOutputFilter();

            // Assigns a handler to the OutputFilterContext.CurrentFilter.OnAfterFiltering event
            OutputFilterContext.CurrentFilter.OnAfterFiltering += CurrentFilter_OnAfterFiltering;
        }

        void CurrentFilter_OnAfterFiltering(ResponseOutputFilter filter, ref string finalHtml)
        {
            var htmlMinifier = new HtmlMinifier();
            MarkupMinificationResult result = htmlMinifier.Minify(finalHtml);
            if (result.Errors.Count == 0)
            {
                finalHtml = result.MinifiedContent;
            }
        }
    }

}
Option 2: Custom module with settings
The above example will use the default settings of WebMarkupMin (removing comments, whitespaces, CDATA sections, minifying JavaScript and CSS) and will enable minification for all sites. As this is not very flexible, we want to control what exactly is minified directly in the Kentico administration interface. The following custom module will create the custom output filter for you in App_Code and add a few settings to Kentico under Settings > System > Performance, which will help you control what exactly the minifier is doing:
Here is how you can import it:
1. Download the module package here:
HTMLminifier.zip
2. In Kentico, go to Sites > Import sites or object
3. Upload the module package and click on Next
4. Click on Select all and make sure you select the Import files (recommended) and Import code files options, then click on Next
Please note, that this module is a proof of concept only, and was not tested with all Kentico versions and in all scenarios.