Extending UniGrid and Filtering Options
In this example we will be extending the OM_Contact table and modifying the UniGrid to include the custom data, as well as give you the ability to filter using the custom column.
The first step is to extend the Contact table with your custom column. The table should be extended through the
Site Manager interface under CMS Site Manager > Development > System Tables > [edit] Contact management - Contact (OM_Contact) > Fields. Once the new field is added, two physical files should be modified to display the new column and allow you to filter:
~\CMSModules\ContactManagement\Controls\UI\Contact\List.aspx
~\CMSModules\ContactManagement\Controls\UI\Contact\Filter.aspx
Begin by modifying the List.aspx file to add your custom column, following the format of other columns included on the page. In this example the
column was added to line 9:
<cms:UniGrid runat="server" ID="gridElem" ObjectType="om.contactlist" OrderBy="ContactLastName"
            Columns="ContactID,ContactLastName,ContactFirstName,ContactEmail,ContactStatusID,ContactCountryID,ContactSiteID,ContactMergedWithContactID,ContactGlobalContactID, ContactCreated, TestColumn"
            IsLiveSite="false" HideFilterButton="true" FilterByQueryString="true" RememberDefaultState="true" RememberStateByParam="issitemanager">
Adding the TestColumn to the Columns property will ensure that your custom column is selected as a part of the SQL call which is getting the data from the database. The column name should match what was added as the new field for the OM_Contact table.
Once you have specified that your column should be included, you can add the UniGrid column as follows:
<ug:Column Source="TestColumn" Caption="Test" Wrap="false"></ug:Column>
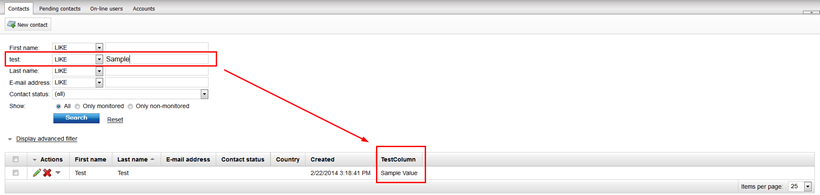
Once added, the column and its values should start appearing in the list of contacts:

Now to update the Filter(.aspx), you would add an additional
Label and
TextSimpleFilter:
<tr>
                <td>
                    <cms:LocalizedLabel ID="lblTestColumn" runat="server" ResourceString="test"
                        DisplayColon="true" EnableViewState="false" />
                </td>
                <td>
                    <cms:TextSimpleFilter ID="fltTestColumn" runat="server" Column="TestColumn" />
                </td>
            </tr>
You can set the visibility for both to Enabled in the Control, or you can set some logic in the codebehind (
Filter.ascx.cs Page_Load) if needed:
lblTestColumn.Visible = true;
fltTestColumn.Visible = true;
You would also update the GenerateWhereCondition() method on line 385 to include the additional where condition from the TextSimpleFilter control.
        whereCond = SqlHelperClass.AddWhereCondition(whereCond, fltFirstName.GetCondition());
        whereCond = SqlHelperClass.AddWhereCondition(whereCond, fltLastName.GetCondition());
        whereCond = SqlHelperClass.AddWhereCondition(whereCond, fltEmail.GetCondition());
        whereCond = SqlHelperClass.AddWhereCondition(whereCond, fltTestColumn.GetCondition());
Once all these changes have been made, you should have the ability to see and filter with your custom columns:
Additionally, in this example we used static values for captions and field names; however, in most cases it would be advisable to use custom resource strings that can be localized:
devnet.kentico.com/docs/devguide/localization_expressions.htm