E-Commerce Customization Best Practices
No two websites are the same and no two clients have the same requirements when it comes to e-commerce. There are plenty of options in Kentico, which can be used out-of-the-box. Just a few examples are role-based discounts, “buy X get Y discounts,” product options, variants and other approaches. This functionality, coupled with marketing automation, gives you a lot of out of the box freedom. However, occasionally some parts of the system will need to be extended or customized. In this article, I’ll try to list the most important customization scenarios and safest approaches in regards to future upgrades of the system.
Update: Kentico 11
This article is compatible with Kentico versions 8.0 - 10. We overhauled and simplified the customisation model in Kentico 11. Please refer to the documentation for more details.The section about ERPs still applies. Additionally you are able to choose uCommerce as your e-shop foundation.
Understanding the checkout
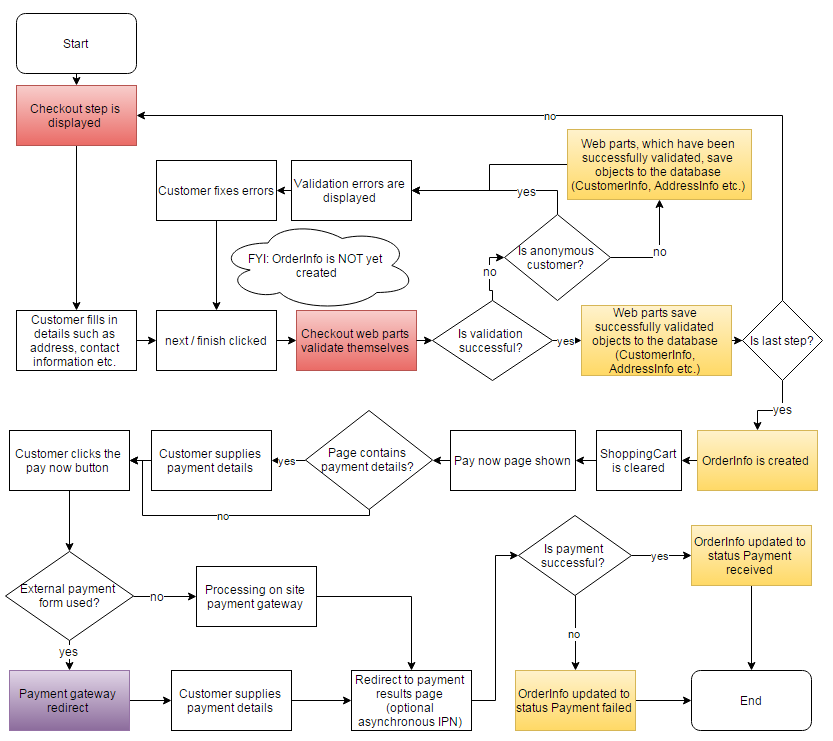
The checkout is the process in which the customer submits his or hers details and pays for the product already in the shopping cart. This means a shopping cart has already been created in the system and there is a corresponding row in the database. The ShoppingCartInfo object is created as soon as the customer (even an anonymous one) adds an item to the shopping cart. The checkout can usually be divided into two checkout approaches, the multistep approach or one-step checkout approach. Both of these approaches are supported out-of-the-box by Kentico. You can find examples of both approaches on our E-commerce starter site sample (the one-step checkout can be found under the “Special pages” section in the content tree). There is no difference between the two approaches when it comes to the implementation customization options, because both approaches use the same component events model. For a better understanding what’s going on during a checkout, please see the flowchart below:
Customizing the checkout is a very straight-forward process because every component is a separate web part. Most of the web parts support transformations (e.g. the Shopping Cart content web part) or alternative forms (e.g. the Customer Detail or the Customer Address web parts), giving you a lot of control over the rendered code. You may need to add another web part to the checkout process and perform a validation before the customer proceeds to the next step. This is a typical scenario, which can be implemented quickly. Before implementing a web part, you’ll need to understand how the default web parts are validated and how they communicate between each other (a great overview is available in this article about Checkout Process Customizations). The checkout web parts communicate via component events. There are certain events, onto which you can attach your code, so that it’s executed, for example, when the Next button is clicked, so you can validate the input live before the customer proceeds to the next step. Here is a chart describing the available events:
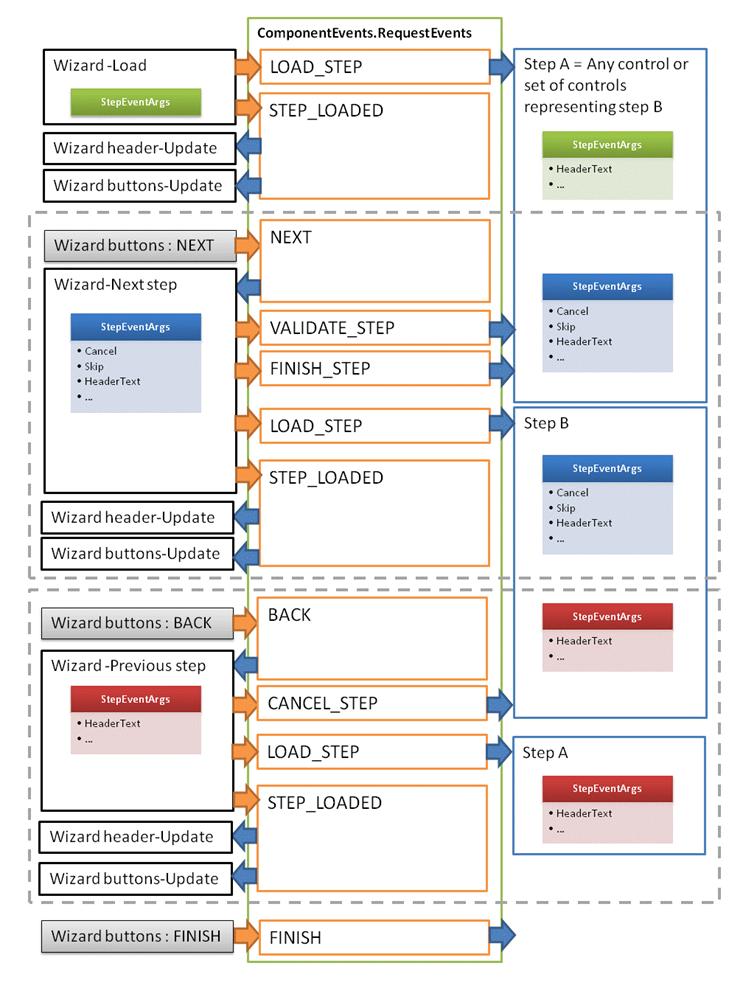
In this example, these events are triggered by the Page wizard button. You can find the following line of code in the code behind of the web part, triggering the “NEXT” event:
ComponentEvents.RequestEvents.RaiseComponentEvent(this, WizardManager.StepEventArgs, "PageWizardManager", ComponentEvents.NEXT);
Checkout web parts can subscribe to these general events:
- LOAD_STEP
- VALIDATE_STEP
- FINISH_STEP
- CANCEL_STEP
- FINISH
There are also 2 checkout specific events:
- SHOPPING_CART_CHANGED = "ShoppingCartChanged"
- MESSAGE_RAISED = "ShoppingCartMessageRised"
To validate your web part input fields, you may subscribe to the VALIDATE_STEP event. A safer approach is to override the ValidateStepData method. You can check one of Kentico’s default checkout web parts for details. You may also use these component events to communicate across other components, like form controls. During checkout these component events shown in the red boxes in the first flowchart. In the “Checkout step is displayed” step the LOAD_STEP event is found. The VALIDATE_STEP event is found in the “Checkout web parts validate themselves” step.
The yellow boxes are meant to highlight events happening in the database. That means that users are able to use Kentico’s Object Event handlers on these parts of the flowchart, so users are able to attach custom code to any of these events. The final common checkout process is the implementation of a custom payment gateway.
Custom fields
A quite common client requirement is to add custom data to the SKUInfo, OrderInfo or to the CustomerInfo class. As mentioned in my previous webinar, users should never customize the database objects directly. Instead, add custom fields only to classes marked as customizable via the Modules application. The mentioned objects are customizable and new fields can be added via the fields section when editing the given class. Other commonly customized objects are available as well. This approach is quite safe and the system will automatically display the newly added custom fields during the checkout or in the UI, because of the alternative forms, as mentioned above. Please don’t use any generic field names, as they can be overwritten during upgrades. The safest way is to use a custom prefix, such as the company name.
A common scenario is to have different prices for different countries (cultures). It’s important to realize, that the SKU object isn’t culture-specific (the only language-specific objects in the system are pages). This scenario can be simply implemented by adding custom fields to the SKU object, which will contain different prices for countries. There is an additional step required in order to implement this scenario and this step involves customizing the SKUInfo provider.
Customizing the Default Behavior of Default Providers
In the above paragraph I’ve touched on the subject of customizing the SKUInfo provider. Customizing InfoProviders allows you to override how the system calculates prices, applies discounts, or the source of the pricing information for each SKU (SKUs) comes from. This customization model isn’t e-commerce-module specific, so it can be used on other objects in the system as well. To continue the above example, the following code may be used to override the GetSKUPriceInternal method to implement custom prices for different countries.
protected override double GetSKUPriceInternal(SKUInfo sku, ShoppingCartInfo cart)
    {
        double price = 0;

        // 1) Get base SKU price according to the shopping cart data (current country)
        if (cart != null)
        {
            switch (cart.ShoppingCartCulture.ToLowerCSafe())
            {
                case "en-us":
                    // Get price form SKUEnUsPrice field
                    price = ValidationHelper.GetDouble(sku.GetValue("SKUEnUsPrice"), 0);
                    break;

                case "cs-cz":
                    // Get price form SKUCsCzPrice field
                    price = ValidationHelper.GetDouble(sku.GetValue("SKUCsCzPrice"), 0);
                    break;
            }
        }
        if (price == 0)
        {
            // Get price from the SKUPrice field by default
            return base.GetSKUPriceInternal(sku, cart);
        }

        // Return custom price
        return price;
    }
This and other examples can be found in the Kentico installation directory (usually c:\Program Files (x86)\Kentico\<version>\CodeSamples\). As you can see, the itself code is quite minimal. We are getting the SKU price according to the ShoppingCartCulture from the custom fields SKUEnUsPrice or SKUCsCzPrice. This customization model may be used to alter how the system behaves. The same approach can be used to implement custom business rules or loyalty programs, which are supported via our Credits Payment module (TIP: You can use credits for refunds).
Custom Shipping
Kentico has added a clean way to implement custom shipping carriers and business rules into the checkout process in more recent versions of the software. A typical example would be country-specific shipping. You can find an example of such an implementation in our documentation. The example provided there has the shipping cost hard-coded, but you can create a simple custom module containing the prices for separate countries, so the prices are configurable through the web interface.
A Few Notes for Integrating with ERPs
Kentico allows you to integrate with any third-party ERP system. There are several ways to integrate the ERP. The choice of method should be based on the synchronization frequency, number of products, synchronization type (one/bi-directional/synchronous/asynchronous), where the stock information is managed etc. Below are some basic guidelines which integration approach to choose, but I still recommend consulting with us on this topic, if you are not sure which path is best for your situation:
Integration Bus
Pros:
- The safest approach, because a message queue is maintained so that tasks can be synchronized; even if there is an interruption the synchronization can continue after the issue has been resolved.
- Flexible, one/bi-directional/synchronous/asynchronous synchronization options are available with configurable synchronization interval via the UI (Scheduled Tasks application).
- A management UI is available with a list of tasks and synchronization errors.
- This method offers simple error recovery, possibility by re-running the synchronization of failed tasks.
Cons:
- A steep learning curve for first-time developers.
- The integration bus method may be possibly slow due to the amount of data to be synchronized.
- No bulk synchronization option is available.
Scheduled Task
Pros:
- Scheduled tasks are straightforward to implement.
- It offers configurable synchronization interval via the UI (Scheduled tasks application).
- Bulk updates are possible.
Cons:
- No synchronous synchronization option is available.
- No error recovery available.
- Scheduled Tasks do not have a task queue and thus no UI for task management.
- Tasks may be run even if there is nothing to synchronize, possibly causing performance issues.
Custom Object Event Handlers
Pros:
- Simple to implement
Cons:
- No asynchronous synchronization option is available
- No error recovery is available.
- Custom Event Handlers don’t offer a task queue and thus no UI for task management.
- Custom Event Handlers don’t allow for bulk updates.
REST
Pros:
- No coding is required.
Cons:
- No error recovery available.
- No task queue, and thus no UI for task management.
- REST doesn’t allow for bulk updates
- REST requires the external system to implement a connector to request and push information.
- The final ‘REST code’ may be quite extensive due to all of the required tasks which have to be performed.
Combining the above approaches is also possible. For example, the outbound synchronization may be implemented via the Integration Bus and the inbound via the REST interface. Another alternative is to use a simple webservice interface.
SKUs connected to pages vs Standalone SKUs
One of the last topics to cover, is product storage. Kentico products can be implemented as standalone SKUs or as SKUs connected to pages. Both of the approaches have pros and cons, so I’d like them to cover as well:
SKUs connected to pages
Pros:
- Workflows are available.
- Translation of page specific fields is available (remember, SKUs are global, not country-specific objects).
- Partial versioning is available (for page fields and some SKU fields).
- Tree structure is available.
- In general, most page-specific functionality is available (categories, tagging etc.).
Cons:
- More advanced API usage is required.
- The Integration bus doesn’t support synching the SKU and Page info at once, thus requiring more error handling.
- Bulk-updates can be problematic due to all the attached functionality (content tree location, workflows etc.).
- They are not suitable for large numbers of products (100 000+)
Standalone SKUs
Pros:
- Simple bulk updates.
- Standalone SKUs offer great performance even for large amount of products.
- They have a simpler API.
Cons:
- No page-specific functionality, such as workflows, categories, tags, tree structure etc.
- No translation support is available.
- No specific page for the products (no URL) is available.
Please note that even though the Standalone SKUs approach doesn’t explicitly support a given feature, there may still be a viable and simple to implement workaround available. A few examples are listed below:
- Translations can be achieved via localization strings.
- Workflows can be used before the product gets published, then it can be detached from the page once it gets published.
- Categories or tags can be implemented as custom fields on the SKUInfo object.
- Dynamic pages can be implemented via wildcard URLs containing the product ID, thus generating product specific pages for website visitors.
Summary
As you can see, the e-commerce module of Kentico is quite complex, but rather simple to customize once you understand its inner workings. While this article has attempted to provide a range of ideas rather than concrete approaches, you can always schedule a consulting session with our team of Solution Architects via consulting@kentico.com if you have any specific scenarios you’d like to discuss which weren’t covered in this article. In general, we strongly suggest consulting on any advanced customization scenarios in order to implement them as effectively and with as little customization as possible. We are here to make Kentico a success for you.