Creating a Braintree Payment Gateway in Kentico
Every e-commerce site is different, and with so many payment processors available, developers are often tasked with integrating with a new system for each project. While legacy providers like Authorize.NET and PayPal have been used for years, newer providers are being launched all the time, expanding the options for companies. In this blog, I’ll show you how to integrate with Braintree, a simple payment gateway with a powerful API behind it.
Like most software companies, payment processors have evolved a lot over the past few years. With the emergence of an API-centric world and modular frameworks, old-timers like Authorize.NET have bolted on the functionality of their systems to meet industry demands. While this approach will work in most cases, these legacy providers will never be quite as lean and agile as a gateway that was created recently if they continue using the same tools and frameworks. For this reason, it’s often much easier to integrate with a newer payment gateway than a legacy one because so much of the code is accessible via APIs and services.
For this article, I’ll be showing you how to create a new payment gateway for Braintree Payments. If you’re not familiar with them, Braintree is a streamlined, API-driven payment processor with tons of capabilities. For the Kentico part, it will be as easy as adding a class and form to get it integrated into my site.
You can find out more about Braintree here.
Creating the Payment Form
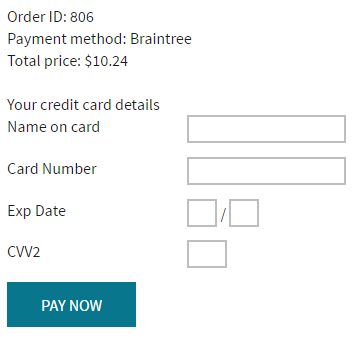
The first step in integrating any payment processor is to make a payment form. This will be a custom web part that will contain all of the fields I need to capture in my payment process. When using AVS and other advanced verification techniques, payment processors often need more information than the standard implementation to approve the transaction.
For my example, I’m capturing the name and CVV code as parts of the transaction. This will be passed along to Braintree for the transaction.
On the back end, I add these values to the PaymentGatewayCustomData object so they can be retrieved during the Braintree integration process.
        PaymentGatewayCustomData["CardName"] = txtCardNumber.Text.Trim();
        PaymentGatewayCustomData["CardNumber"] = txtCardNumber.Text.Trim();
        PaymentGatewayCustomData["CVV2"] = txtCVV2.Text;
        PaymentGatewayCustomData["ExpMonth"] = txtExpDateMonth.Text;
        PaymentGatewayCustomData["ExpYear"] = txtExpDateYear.Text;
Creating the CMSPaymentGatewayProvider Class
The next step is to add the custom CMSPaymentGatewayProvider class. This is where all of my Braintree integration is handled using the Braintree API. In this class, I override the ProcessPayment method with my custom code. This follows the same pattern as many other Kentico APIs and allows me to encapsulate my code into a nice area.
        /// <summary>
        /// Process payment.
        /// </summary>
        public override void ProcessPayment()
I override the GetPaymentDataFormPath method with a path to my custom payment form. This will tell Kentico what control to load for the payment process.
        /// <summary>
        /// Returns path to payment gateway form with custom controls.
        /// </summary>
        public override string GetPaymentDataFormPath()
        {
            return "~/DancingGoat/Controls/BraintreePaymentForm.ascx";
        }
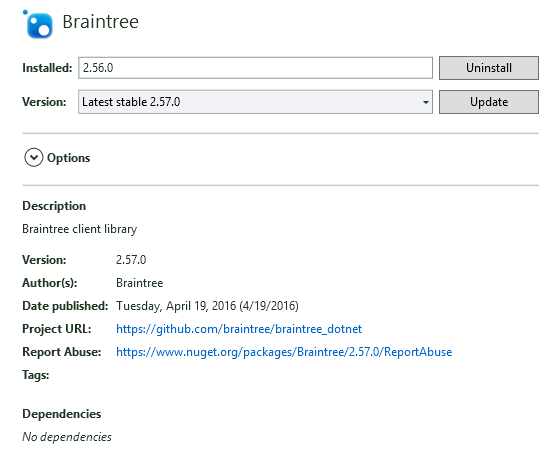
Adding the Braintree SDK
The next step is to add the Braintree SDK. There is a NuGet package that makes this extremely easy and gives me all of the libraries I need to work with the Braintree API.
Adding the Braintree Integration
For my PaymentGateway class, I need a BraintreeGateway object to communicate with the Braintree systems. In my BraintreePaymentGateway class, I define a static BraintreeGateway constructor using some custom settings I created to hold both my Private and Public API keys and MerchantID.
public static BraintreeGateway gateway = new BraintreeGateway
        {
            Environment = SettingsKeyInfoProvider.GetBoolValue("BraintreeTestMode") ? Braintree.Environment.SANDBOX : Braintree.Environment.PRODUCTION,
            PublicKey = ValidationHelper.GetString(SettingsKeyInfoProvider.GetSettingsKeyInfo("BraintreePublicKey").KeyValue, ""),
            PrivateKey = ValidationHelper.GetString(SettingsKeyInfoProvider.GetSettingsKeyInfo("BraintreePrivateKey").KeyValue, ""),
            MerchantId = ValidationHelper.GetString(SettingsKeyInfoProvider.GetSettingsKeyInfo("BrainTreeMerchantID").KeyValue, "")
        };
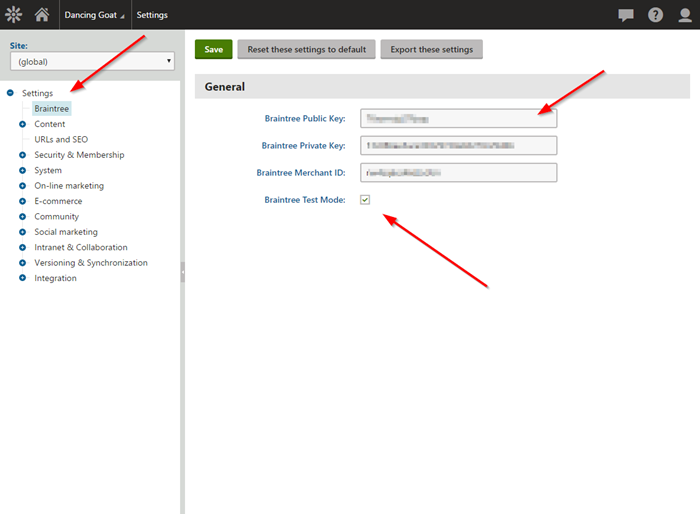
Note that I also add a “test mode” setting. This will allow me to send transactions to the Braintree Sandbox during my development process.
Processing the Transaction
The final integration piece is to the process the transaction using the Braintree API. To do this, I create a TransactionRequest object and populate it with the user’s details. I pull the Card Number, Name, CVV, and Expiration Date values from the PaymentGatewayCustomData object that I set in my payment form.
                // Create the transaction
                TransactionRequest transactionRequest = new TransactionRequest
                {
                    Amount = ValidationHelper.GetDecimal(Order.OrderTotalPrice, 0),
                    CreditCard = new TransactionCreditCardRequest
                    {
                        CardholderName = ValidationHelper.GetString(PaymentDataForm.PaymentGatewayCustomData["CardName"], ""),
                        Number = ValidationHelper.GetString(PaymentDataForm.PaymentGatewayCustomData["CardNumber"], ""),
                        CVV = ValidationHelper.GetString(PaymentDataForm.PaymentGatewayCustomData["CVV2"], ""),
                        ExpirationMonth = ValidationHelper.GetString(PaymentDataForm.PaymentGatewayCustomData["ExpMonth"], ""),
                        ExpirationYear = ValidationHelper.GetString(PaymentDataForm.PaymentGatewayCustomData["ExpYear"], ""),
                    },
                    BillingAddress = new AddressRequest
                    {
                        StreetAddress = Order.OrderBillingAddress.AddressLine1,
                        ExtendedAddress = Order.OrderBillingAddress.AddressLine2,
                        Locality = Order.OrderBillingAddress.AddressCity,
                        CountryName = country.CountryTwoLetterCode,
                        PostalCode = Order.OrderBillingAddress.AddressZip
                    }
                };
Many payment providers require the billing address as part of the verification process. I pull these values from the Order object containing the user’s billing information entered earlier in the checkout process.
With those values populated, I’m ready to execute the transaction
                // Post to Braintree and get the result
                Result<Transaction> result = gateway.Transaction.Sale(transactionRequest);
Based on the results of the transaction, I set the Kentico transaction details with the appropriate values.
                //Check if the transaction was successful
                if (result.IsSuccess())
                {
                    PaymentResult.PaymentIsCompleted = true;
                    PaymentResult.PaymentTransactionID = result.Target.Id;
                    PaymentResult.PaymentStatusName = "Completed";
                    PaymentResult.PaymentStatusValue = "completed";
                    ErrorMessage = "";
                    InfoMessage = "Payment succeeeded!";
                }
                else
                {
                    ErrorMessage += result.Message;
                }
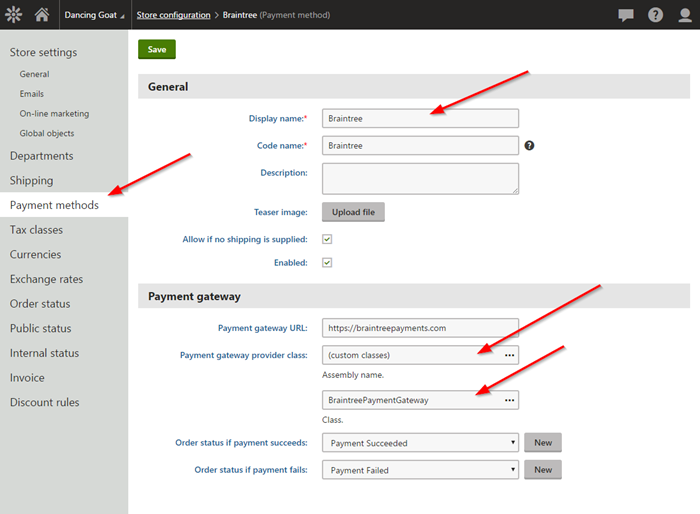
Registering within Kentico
After creating all of the integration, I register the payment gateway within Kentico and assign it to my shipping methods.
You can find out more about registering a custom payment gateway here.
Testing
With all of the code in place, I can test my integration. First, I set my custom setting values with my Braintree account information.
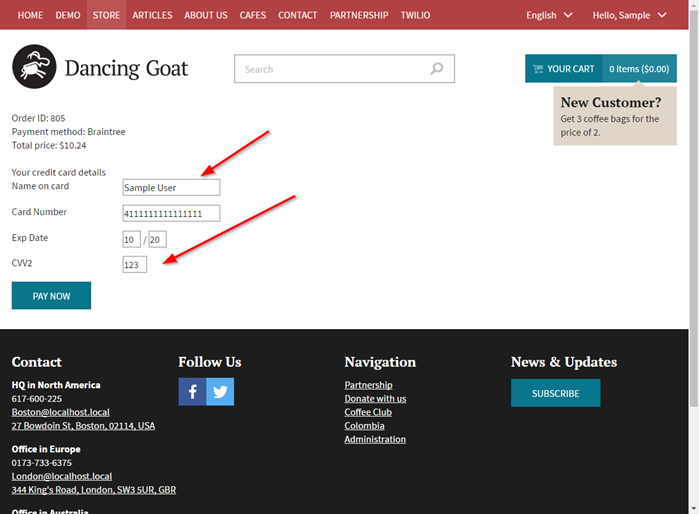
I complete a purchase and enter my payment information.
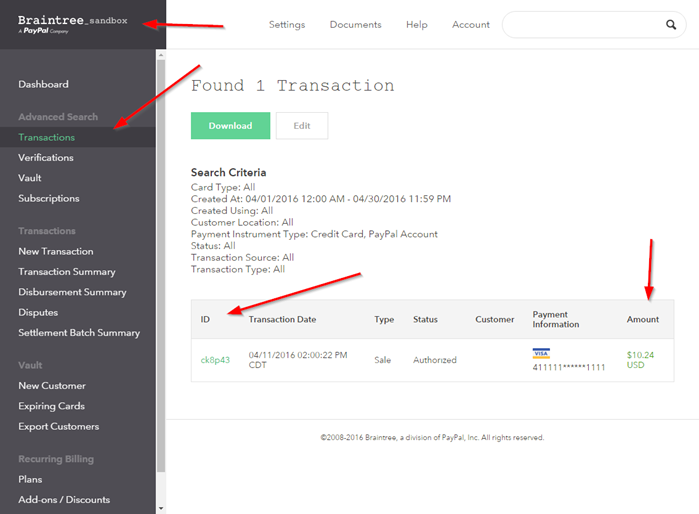
A successful transaction is logged into the Braintree Dashboard.
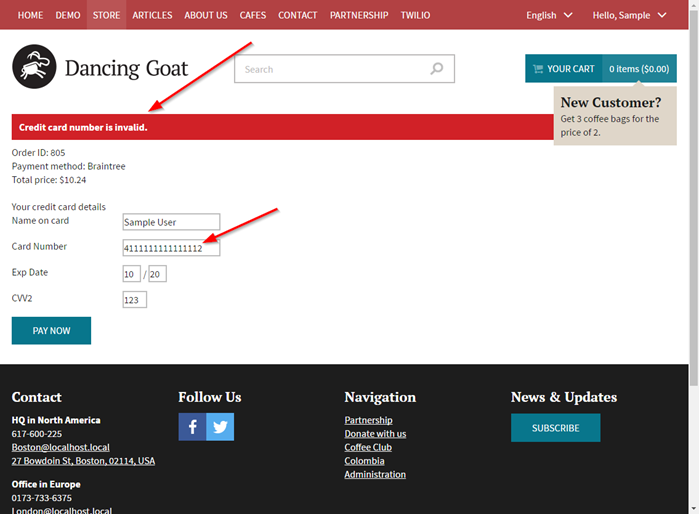
If a user enters incorrect information, the payment form displays the error.
Moving Forward
As you can see, Braintree makes it very easy to integrate with its systems and process transactions. In your Braintree account, you can configure all of your AVS and CVV settings, ensuring you are verifying payment methods appropriately. Additionally, you may need to add more fields to your payment form to meet your needs.
You can find out more about the options available with the Braintree API here.
I hope this blog helps you with your e-commerce sites and shows just how easily you can integrate with a new payment gateway. Good luck!
Get the code
This blog is intended for informational purposes only and provides an example of one of the many ways to accomplish the described task. Always consult Kentico Documentation for the best practices and additional examples that may be more effective in your specific situation.