Claims-based authentication: Common issues
In the previous series, we configured both Windows Server 2012 R2, our virtual machine, and Kentico and successfully logged in. We will discuss some of the most common issues when it comes to claims-based authentication.
Issue 1: When I try to sign-in to Kentico it gives me the following exception: “Identity provider didn't provide username claim. Please configure your provider to do so.”
In this case, the problem is related to the configuration of the identity provider. The returned token from the identity provider must provide a claim containing the user name and properly declare the name claim type as we did when we were adding a new rule. In this case, you can use Fiddler and investigate the POST requests to find out if there is a name attribute in the POST request. The steps are the following:
- open Fiddler and enable capturing of the requests
- enable decrypting HTTPS traffic in Fiddler, for more information please see http://www.fiddlerbook.com/fiddler/help/httpsdecryption.asp
- open your browser and try to sing-in to Kentico
- investigate the request, see the screenshot below for more details
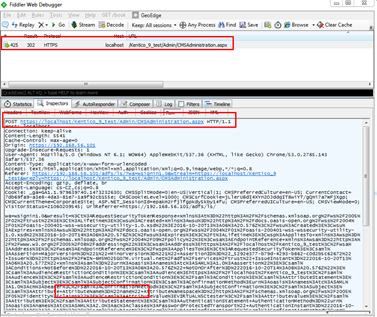
On the screenshot, you can see that the attribute Name was part of the POST request.
Issue 2: When I try to sign-in to Kentico it gives me the following exception: “Untrusted certificate.”
There are two main reasons for the Untrusted certificate error. The first way to get this error, is the inconsistency in thumbprints, so the first thing you need to do is verify that the thumbprint in Kentico settings is the same as the thumbprint used in the AD FS server. The other way to get this error is to use the protocol, which is not supported.
In older versions, you might encounter this error even when the correct thumbprint and the supported protocol were used. In older versions, it was necessary to include the thumbprint without spaces or special characters. You needed to be careful because, when you copy the thumbprint, sometimes there were invisible characters which caused this error. The best way to avoid this was to copy and paste your thumbprint, for example, to Notepad and check whether there are any special characters or not. The good news is that we improved this behavior and since version 8.2.42 you can include the thumbprint with spaces or special characters.
Issue 3: Unsupported Identity Provider
In some scenarios, it might happen that some of the identity providers will not fulfill the requirements we have in Kentico. Identity providers must fulfill the following requirements to work with the default claims-based authentication in Kentico:
- They must be backward compatible with the sign-in request message format used by ADFS version 1.0 (seeSignInRequestMessage for technical details).
- The returned token must provide a claim containing the user name and properly declare the name claim type.
In case the identity provider you are going to use is not compliant with any of those requirements, you will have to implement custom claims-based authentication as described here https://docs.kentico.com/display/K82/Handling+custom+claims-based+authentication.
Issue 4: Claims-based authentication does not have any support for roles
Currently, out-of-the-box WIF authentication in Kentico does not have any support for roles. For this purpose, you could use AD Import Tool, but in certain scenarios, this might not be a feasible solution. Since the role information is provided by SAML already, we will create a custom code that will hook into the authentication events to populate role information into Kentico. Here are some scenarios that will be covered in the custom code:
- New user login for the first time—assign the user to all the existing roles he belongs to
- Remove the role(s) the user is no longer part of, based on ADFS
- The role(s) updates of the user in CMS is dynamic, based on every authentication process against ADFS.
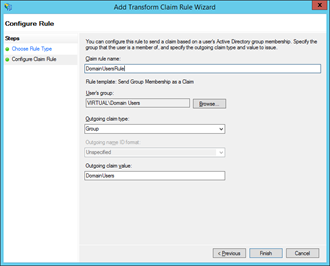
In my case, I will create a new class called CustomWIFAuthenticationModule inside the App_Code folder. Next thing we need to do is to configure AD FS on the virtual machine. In the Server Manager, click Tools and open the AD FS Management application. Expand the Trust Relationships folder and click Relying Party Trusts folder. You should see the relying party we created before. Right-click it, select Edit Claim Rules option, and click Add Rule button. In the Add Transform Claim Rule Wizard select Send Group Membership as a Claim template and click Next. In the Configure Claim Rule interface set Claim rule name, for example, to DomainUsersRule. In my case, I will set the user’s group to VIRTUAL\Domain Users. The Outgoing claim type needs to be set to Group and the Outgoing claim value set to DomainUsers. Once you are done with this configuration, click the Finish button.
At this moment, once you try to sign-in with the user it will get the roles the user should be in from AD FS. Check to see if the role exists or not in Kentico and add the user to that role.
This brings us to the end of the Claims-based authentication series. We took a look at how to prepare a virtual environment so you can test AD FS, we also configured an AD FS role on Windows Server 2012 R2 from scratch, and we moved to the Kentico site and enabled Claims-based authentication in Kentico. Finally, we discussed some of the most common issues when it comes to Claims-based authentication in Kentico. I enjoyed creating this series for you and I hope you will find it useful.