Adding Google Authenticator Support to Kentico Logon
This article will cover how you can add GoogleAuthenticator logic / QR code generation to your Kentico project as a replacement for Kentico MFA.
Disclaimer: This will require you to modify built-in Kentico logon components and the changes may need to be merged into new versions of these files during upgrades.
We have a lot of customers that request that we add support for GoogleAuthenticator, instead of our built in Multi Factor Authentication. Currently, there are no plans for us to include this feature as part of Kentico’s MFA solution. In this article I will describe how to circumvent our MFA solution and, using a third party library, configure Google Authentication.
First, since we do not expose the appropriate methods to be able to override our built-in MFA logic for generation of an MFA token/hash, we will need to modify the web parts/controls that handle the call to these API’s. You will need a NuGet package called GoogleAuthenticator to simplify the generation of hash/token; you can find it here:
https://www.nuget.org/packages/GoogleAuthenticator/1.0.0
You can install it via Nuget Package Manager for your solution by right clicking your Solution, click “Manage Nuget Packages for Solution” then in the “Search Online” field simply search for GoogleAuthenticator. It should be the only result; the author is Brandon Potter.
We will need to modify the CMSPages\logon.aspx and logon.aspx.cs files to take advantage of this new package, here are the modifications to make:
CMSPages\logon.aspx ~line 46 there should be the following code:
<div class="logon-text token-label">
      <cms:LocalizedLabel ID="lblTokenID" runat="server" />
</div>
you should modify it to add two new controls like the following:
<div class="logon-text token-label">
      <asp:Image ID="qrCodePairGoogleAuth" runat="server" />
      <asp:Literal ID="manualGoogleAuth" runat="server" />
      <cms:LocalizedLabel ID="lblTokenID" Visible="false" runat="server" />
</div>
The image control will be used to display the QRCode that Google Authenticator can scan and the Literal will be used to display the manual key in case the user cannot use the provided QRCode.
Once you have made these modifications to the aspx you can then move on to the following edits in the code behind:
CMSPages\Login.aspx.cs ~line 1 include the Nuget Package assembly:
using Google.Authenticator;
CMSPages\Login.aspx.cs ~line 34 directly after #region “Properties” create a new TwoFactorAuthenticator object
private TwoFactorAuthenticator tfa = new TwoFactorAuthenticator();
CMSPages\Login.aspx.cs ~line 320 there is the following if statement:
if (MembershipContext.MFAuthenticationTokenNotInitialized && MFAuthenticationHelper.DisplayTokenID)
{
      var lblTokenID = Login1.FindControl("lblTokenID") as LocalizedLabel;
      var plcTokenInfo = Login1.FindControl("plcTokenInfo");

      if ((lblTokenID != null) && (plcTokenInfo != null))
      {
             DisplayWarning(string.Format("<strong>{0}</strong> {1}", GetString("mfauthentication.isRequired"), GetString("mfauthentication.token.get")));

             lblTokenID.Text = MFAuthenticationHelper.GetTokenIDForUser(Login1.UserName);
             plcTokenInfo.Visible = true;
       }
}
Which should be modified to match this, instead:
if (MembershipContext.MFAuthenticationTokenNotInitialized && MFAuthenticationHelper.DisplayTokenID)
{
      var lblTokenID = Login1.FindControl("lblTokenID") as LocalizedLabel;

      // get the controls to display the value to input to google authenticator
      var qrCodePairGoogleAuth = Login1.FindControl("qrCodePairGoogleAuth") as Image;
      var manualGoogleAuth = Login1.FindControl("manualGoogleAuth") as Literal;

      var plcTokenInfo = Login1.FindControl("plcTokenInfo");

      if ((lblTokenID != null) && (plcTokenInfo != null))
      {
           DisplayWarning(string.Format("<strong>{0}</strong> {1}", GetString("mfauthentication.isRequired"), GetString("mfauthentication.token.get")));

           lblTokenID.Text = MFAuthenticationHelper.GetTokenIDForUser(Login1.UserName);

           // create a new SetupCode
           SetupCode sc = tfa.GenerateSetupCode(Login1.UserName, lblTokenID.Text, 100, 100);
           // populate the qrcode image URL for setup in google authenticator
           qrCodePairGoogleAuth.ImageUrl = sc.QrCodeSetupImageUrl;
           // populate manual text key for setup in google authenticator
           manualGoogleAuth.Text = "Manual Entry: " + sc.ManualEntryKey;

           plcTokenInfo.Visible = true;
     }
}
I have added individual comments where needed but on a general level, this makes it so that we are still using the TokenID that Kentico generates for the built in MFA authentication as our secret token for Google Authenticator. Essentially it is the first 13 characters of a Guid string that we store in the CMS_User table under UserTokenID. This is important since we need to retrieve it later in code to authenticate.
The final code change you should make for the login page is in the same file
CMSPages\logon.aspx.cs inside the Login1_Authenticate method, under the "Validate passcode" comment, you will change the else statement to:
else
{
     // get the user that is trying to login based on the username they have provided
     UserInfo currUser = UserInfoProvider.GetUserInfo(Login1.UserName);
     // retrieve the UserTokenID to use for the secret
     String lblTokenID = MFAuthenticationHelper.GetTokenIDForUser(Login1.UserName);

     // verify the passcode provided by the user (from google authenticator) matches the proper value, if it is - authenticate user.
     if (tfa.GetCurrentPIN(lblTokenID) == passcode)
     {
          e.Authenticated = true;
     }
}
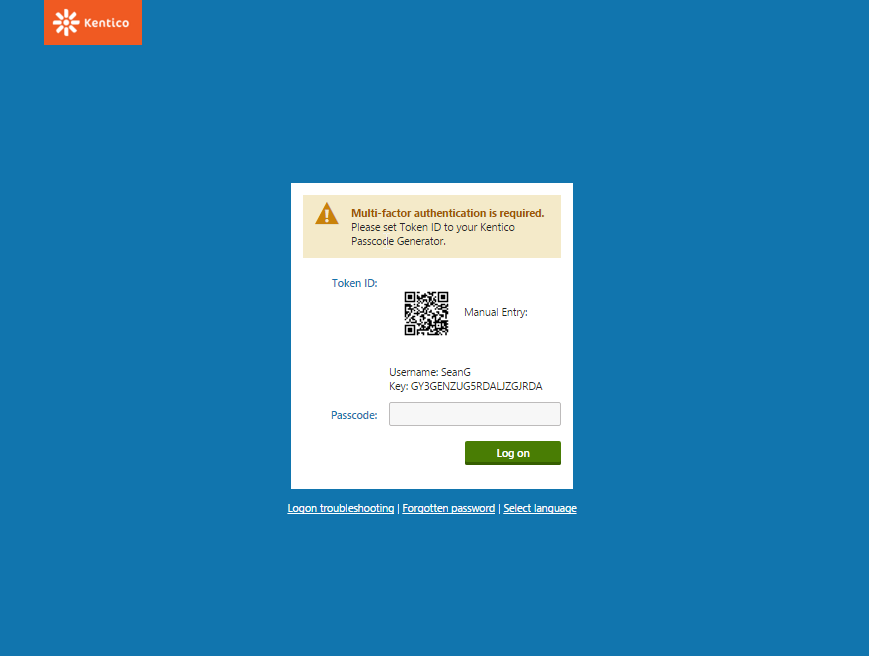
Once you set this up, it validates the user using Google Authenticator each login attempt. On the first visit after MFA is enabled it will present the user with a QRCode and a manual key for them to enter into the Google Authenticator application. Once the user has set this up for the first time, it will only ask for the passcode and will no longer present the QRCode / Manual setup key for obvious security reasons.
Now that we have the login page working with Google Authenticator we can get the two logon form Webparts working with it as well. I am only going to cover one of the logon Webparts in this article as the modifications would be very similar between the two. The webpart we will be working with is LogonForm, the files we need to edit for this are ~\CMSWebParts\Membership\Logon\LogonForm.ascx and the code behind; LogonForm.ascx.cs.
First, we will do the same thing to this LogonForm.ascx that we did to the Login page, find the following lines:
<div class="editing-form-value-cell">
      <cms:LocalizedLabel ID="lblTokenID" runat="server" />
</div>
And change it to the following:
<div class="editing-form-value-cell">
     <asp:Image ID="qrCodePairGoogleAuth" runat="server" />
     <asp:Literal ID="manualGoogleAuth" runat="server" />
     <cms:LocalizedLabel ID="lblTokenID" Visible="false" runat="server" />
</div>
Again, this will give us a place to put the QRCode image as well as a place to put the manual key for the authentication.
Now for the code behind we need to include the Google.Authenticator assembly at the top of the LogonForm.ascx.cs file:
using Google.Authenticator;
Now we will add the TwoFactorAuthenticator object right after #region “Variables” like before:
private TwoFactorAuthenticator tfa = new TwoFactorAuthenticator();
Next we need to edit LogonForm.ascx.cs ~line 300 there is an if statement:
if (lblTokenID != null)
The if statement should be changed to look like this look like this:
if (lblTokenID != null)
{
lblTokenID.Text = MFAuthenticationHelper.GetTokenIDForUser(Login1.UserName);
//most likely you will need to retrieve the controls from the placeholder because of the update panel, which is what we are doing here.
Image qrCodePairGoogleAuth = (Image)plcTokenInfo.FindControl("qrCodePairGoogleAuth");
Literal manualGoogleAuth = (Literal)plcTokenInfo.FindControl("manualGoogleAuth");
// create a new SetupCode
SetupCode sc = tfa.GenerateSetupCode(Login1.UserName, lblTokenID.Text, 100, 100);
// populate the qrcode image URL for setup in google authenticator
qrCodePairGoogleAuth.ImageUrl = sc.QrCodeSetupImageUrl;
// populate manual text key for setup in google authenticator
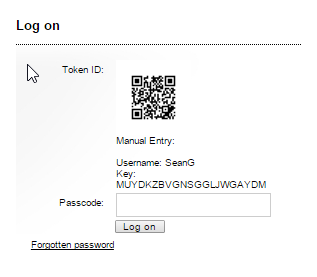
manualGoogleAuth.Text = "<br />Manual Entry: <br /><br />" + "Username: " + sc.Account + "<br />Key: " + sc.ManualEntryKey;
}
As you can see we are now doing the same thing as we did in the previous page, setting the QRCode image path and the manual text from the front. In this case we had to look up the controls using FindControl because they are not visible due to the update panel settings.
Finally, for the LogonForm Webpart, we need to make it authenticate in the correct way, to do this we edit the LogonForm.ascx.cs file inside Login_Authenticate method there is a comment "Validate passcode" like this:
else
{
      if (provider.MFValidatePasscode(Login1.UserName, passcode))
      {
           e.Authenticated = true;
      }
}
We will need to change this to the same code we used in the logon page:
else
{
     // get the user that is trying to login based on the username they have provided
     UserInfo currUser = UserInfoProvider.GetUserInfo(Login1.UserName);
     // retrieve the UserTokenID ( or stored guid ) to use for the secret
     String lblTokenID = MFAuthenticationHelper.GetTokenIDForUser(Login1.UserName);
     //verify the passcode provided by the user ( from google authenticator ) matches the proper value, if it is authenticate user.
     if (tfa.GetCurrentPIN(lblTokenID) == passcode)
     {
           e.Authenticated = true;
     }
}
This Web Part is now ready to work with our custom Google Authenticator. You can style everything however you want it to work with your theme, and then proceed to make the same changes to your LogonMiniForm.ascx / ascx.cs.
If a user forgets or removes their token from Google Authenticator, they will need to contact an Administrator to have their token reset. The Administrator can reset the token by going to Administration > Users > edit desired user > Reset token ID.
See also:
https://docs.kentico.com/display/K9/Configuring+multi-factor+authentication