Kentico CMS 7: Advanced Workflow
Building the content of a website with several editors usually comes with the need to approve this content before publishing, to provide reliable and consistent information to site visitors. This is one of the many scenarios where the Workflow module can be applied. The Advanced Workflow module, with features like branching based on macro conditions, user choices, automated actions and timed actions, brings more power in defining document approval processes to cover even advanced scenarios.
In general, Advanced workflow has the same new settings as basic workflow, which were introduced in my
previous blog post. The most noticeable difference between these two workflow types is in the process of designing the workflow.
Designing workflow
Advanced workflow has a completely new user interface for steps definition. The figure below shows the workflow designer. You can simply drag & drop new steps from the toolbar, connect them to build the approval path or rearrange them just by dragging.

From the designer toolbar you can search the available steps, delete existing steps and also turn Snap to grid behavior on and off for the steps.
Step types
As the previous figure shows, workflow comes with several step types. There are three main types in total.
Standard steps
These steps are familiar from the basic workflow:
-
Edit - This is the initial step for the workflow.
-
Standard - This is the custom step to provide an additional approval phase.
-
Published - This step represents the published state of a document.
-
Archived - This step represents the archived state of a document.
The figure below shows basic approval process with one custom step.
.png "basic-(1).png")
Branch steps
One of the benefits of the Advanced workflow is the ability to branch the approval process of a document. Based on a current context or other conditions, you can choose different approval paths. The list consists of these steps:
-
Condition - This step allows splitting of the workflow process into two branches based on a defined condition.
-
Multi-choice - This step allows specifying a set of conditions, which, if met, will allow users to choose the branch the workflow process should continue in.
-
First win - This step allows specifying a number of conditions. The first condition that is met will determine the branch the workflow process should continue in. The order is mandatory. It simulates the priorities.
-
User choice - This step allows editors to choose the next step the workflow process should continue in.
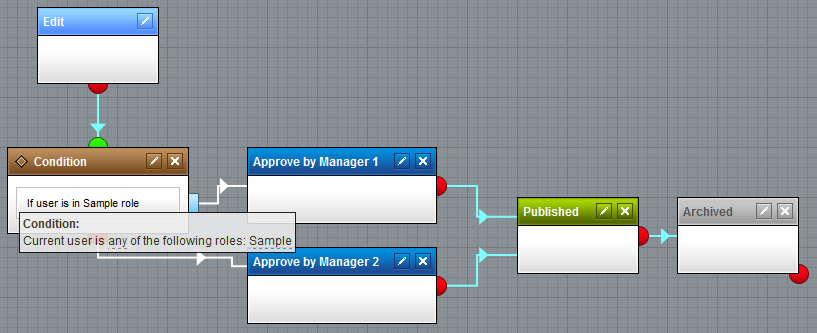
The figure below shows the approval process with the Condition step. Changes made by editors in Sample role are approved by Manager 1. In other case the changes are approved by Manager 2.
Wait step
This step allows specifying the amount of time after which the document should automatically be moved to the next step. To better understand the usage of this step type, take a look at the following image. After a custom e-mail is automatically sent, the system waits 14 days before sending out another custom e-mail.

Action steps
The action steps are special workflow steps. When a document reaches this step, the particular action is processed. These workflow actions are available:
-
Copy document - This action can copy defined document(s) including the current one to a defined content section.
-
Delete document - This action can delete defined document(s) including the current one.
-
Link document - This action can link defined document(s) including the current one to a defined content section.
-
Send e-mails - This action can send a custom e-mail based on an e-mail template or text to defined recipients.
-
Send notification e-mails - This action can re-send the workflow notification e-mails.
-
Set document property - This action can set a defined value to a defined document property.
-
Synchronize document - This action can synchronize defined document(s) including the current one using the Staging module.
To better understand the usage of the action steps, let's take a look at the following figure. In this sample scenario when a document is archived (moved to the archived step), it is automatically moved after a period of time to the '/Archive' content section, to keep archived documents in a separate location. Of course you can imagine a lot of different scenarios which can be achieved with action steps.

I will describe action steps later in more details.
Step properties
Besides the general step settings, the edit dialog also provides the following settings:
Advanced settings
-
User action text - This text is displayed in the document user interface as Approve button text.
-
User action tooltip - This text is displayed as a button tooltip in the document user interface.
-
Condition - This condition indicates if the approve button should be enabled. You can specify custom conditions under which the approval action is allowed.

These settings are reflected in the user interface:

Timeout settings
The timeout settings allow you to define a specific interval or day when the document will be moved to the next step. You can also define different paths for the timeout.

To better understand the timeout settings, let's take a look at the following image. If the document is not approved to the next step by the first day of the next month (due to previous settings), the workflow notification e-mails are sent again to remind the editors that there is a document awaiting their approval.

Branching and Conditions
When you edit the properties of one of the Branch steps you will find one additional tab - Cases. Here you can edit each case properties.

For each step, you can define:
-
Designer label - Text displayed in the designer.
-
User action text - This text is displayed in the document user interface as Approve button text.
-
User action tooltip - This text is displayed as a button tooltip in the document user interface.
-
Condition - This condition indicates if the case should be visible. You can specify custom conditions under which the approval action is displayed.
The figure below shows case configuration. This option is displayed in the user interface only for the user whose user name equals 'administrator'.

When the 'administrator' user is about to approve the document, the user interface is similar to the following:

Besides the standard macro conditions, it is possible to use one of the predefined Macro rules.

The Macro rules are a great help when you are defining step conditions and you don't have a deep knowledge of macro expressions.

Workflow Actions
Workflow actions are represented by action steps. The list of workflow actions can be found in the Workflow user interface.

You can define your custom action by defining its properties, including visual representation, assembly and class name etc.
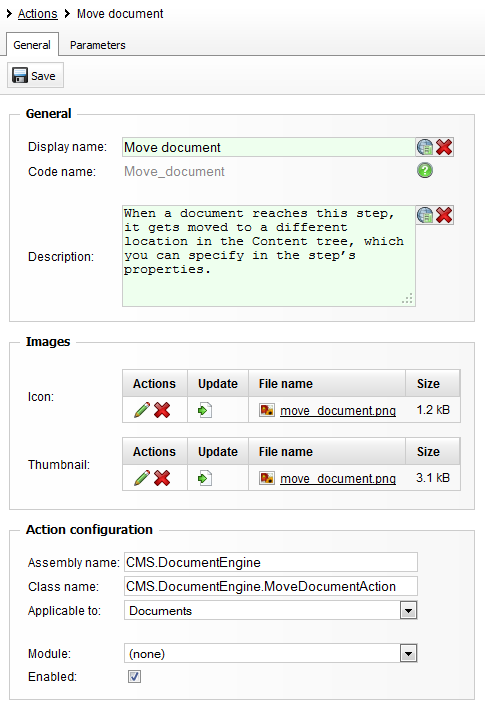
You can also define action parameters which can later be set up for particular action step.

Parameter values can be entered in the step properties when the action step is edited through the designer.

The next step to complete the creation of a workflow action is to implement a class (write a code using API) which will handle the action. Basically if you are familiar with implementation of custom scheduled tasks in Kentico CMS, creating the workflow action will be a piece of cake.
More details will be described in my next blog post in which I will explain the process of creating custom workflow actions.
So these are the main features of the Advanced workflow module. I hope you will enjoy them and find them useful. Should you need any additional information, please feel free to post a comment below.