Data.com Connector Updated
We have made a major change to the Data.com connector after reviewing the licensing options available for Data.com development models. As of now you need to have v7 installed with the latest hotfix applied (7.0.44 or newer) to be able to use the Data.com connector. The Data.com connector is currently available in v7 in the default installation.
Before we review what has changed, let’s cover several things first:
Hotfix instructions
You need to apply the latest hotfix (7.0.44 or newer) on your v7 installation in order to use the connector. After you apply the hotfix, you need to perform two additional steps:
-
Create two new fields in the User - Settings System table:
-
“UserDataComUser” of type Text with a size of 200
-
“UserDataComPassword” of type Text with a size of 200
-
On web application projects, manually include 2 files in the project:
-
~\CMSModules\ContactManagement\FormControls\DataCom\DataComLogin.ascx
-
~\CMSModules\ContactManagement\Pages\Tools\DataCom\Login.aspx
Custom code = custom token
In a case you are going to customize the default functionality of the Data.com connector you are required to ask Salesforce for your own API access token according to the licensing terms. You can provide the token to your code easily by creating a class that implements ITokenProvider, where you will enter your custom token. Then you can place this class into the App_Code folder. Here is an example:
using CMS.DataCom;
public class CustomDataComTokenProvider : ITokenProvider

	{

	    /// <summary>

	    /// Gets the token used for Data.com communication.

	    /// </summary>

	    /// <returns>Token</returns>

	    public string GetToken()

	    {

	        return "Your Data.Com API Token";

	    }

	}
Finally, you are able to use the class with your token as follows:
DataComClient client = DataComHelper.CreateClient(new CustomDataComTokenProvider());
API call limit
The Data.com connector contains an integrated buffer for calling the Data.com API to prevent reaching of the API call limit. Despite that, the API call limit might be reached for various reasons. In such cases, please contact Kentico support immediately so that the API call limit can be raised.
Now we can familiarize ourselves with the changes in the Data.com connector’s functionality:
Functionality changes
As you might have guessed, the first change is how the system stores the API token. It is stored globally for the whole application and you are able (and required) to provide your own token if you make any changes in the code of the Data.com connector.
Another change is how Data.com user credentials are stored. Those are no longer stored in the Settings for whole sites, but rather in individual locations where credentials are actually required for each user. As you might know, the Data.com connector is used in two locations – in the Contacts section on the Data.com tab and in Data.com steps of Marketing Automation processes. We will review both places now.
Contacts – Data.com section
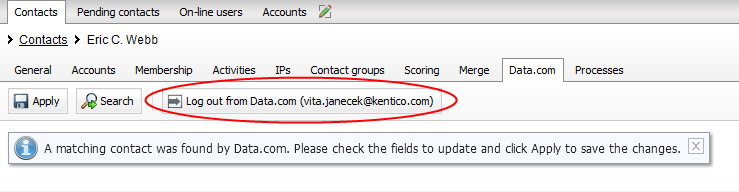
Let’s see how it behaves in the Contacts and Accounts section on the Data.com tab. In order to access Data.com functionality, a user must log in using his or her Data.com credentials. The user will stay signed in whenever he or she returns to this section.
Initially, the Data.com tab displays a login screen:

After successful sign-in using Data.com credentials, the user is able to use Data.com functionality and also logout:
Marketing automation – Data.com step
Finally, let’s see the Data.com functionality in the Marketing automation processes – Data.com step. The user needs to enable the step by signing-in with his or her Data.com credentials. Unless the step is authorized with Data.com credentials it is disabled.
 The Data.com connector is a great way to keep your Contacts’ information up-to-day and get information on customers in early engagement stages when their profiles are incomplete. You can leverage the Data.com connector’s functionality as an automatic process within Marketing automation, as well as a manual tool within the Contact profile section. The Data.com connector is fully integrated within v7 Kentico EMS as a part of the default installation.