DIY: How to make a chat module
Are you missing the chat functionality in Kentico CMS? Don't you want to integrate with other solutions? Read this to see how simple it is to create your own chat module ...
Hi there,
The time has come, all the prerequisities are ready, so let's see how you can build your own simple chat module in matter of hours (or copy-paste this sample in matter of minutes).
Prerequisities
What you should know before you start is following:
I covered it separately not only to reduce the length of this post so it can be better to remember, but also because that other functionality may be used for other things, so I didn't want to hide it too much. So learn that before you start, you will need it.
Design of our chat
Speaking about simple chat, let's see what wee need for it:
-
We want the chat for authenticated users only, not only because it is simpler, but also because it prevents unwanted spammers.
-
Some list where we can store the comments posted by users, it would be nice if the user could send a private message to specific user, too.
-
Some list where we can store the list of users that are currently present.
-
We always want to keep only information for some specific time, so wee need a scheduled task that will periodically clear the lists from outdated records.
-
The live site face for the chat, where we need some input form for the new messages, and lists of messages and users on the chat, and we want it to be AJAX based, and refresh that information on a periodical basis.
So that are our needs, let's fulfill them ...
Preparing the data structure
Firstly, we want to prepare the list for messages. So go ahead and create new
Custom table
Display name: Chat - Messages
Class name: custom.chatmessage
Table name: custom_chatmessage
With following fields:
-
ItemID, ItemCreatedWhen, ItemCreatedBy, ItemGUID provided automatically
-
MessageText - Text, 2000 characters, Text area
-
MessageFromNickName - Text, 100 characters, Text box
-
MessageToNickName - Text, 100 characters, Allow empty value, Text box
-
MessageFromUserID - Integer, User selector
-
MessageToUserID - Integer, Allow empty value, User selector
If you define the fields like this, you can get nice view and editing options in the custom table UI.
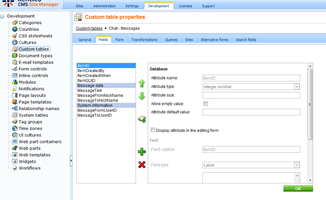
As you can see, we will be referring to the users by IDs (so we can filter private messages) and we are also including nicknames to have just one flat table and avoid View. Later, this can be also used to support anonymous users that do not have an ID.
Now, let's do something similar for the list of users, with new
Custom table:
Display name: Chat - Members
Class name: custom.chatmember
Table name: custom_chatmember
With following fields:
-
ItemID, ItemGUID provided automatically
-
MemberUserID - Integer, User selector
-
MemberNickName - Text, 100 characters, Text box
-
MemberLastActive - Date and time, Allow empty value, Calendar (last active means when the user posted something the last time)
-
MemberLastPresent - Date and time, , Calendar (last present means when the user viewed the messages the last time)
This is a list containing the users on the chat and their activity time stamps so we can decide which aren't active and should be removed from the list.
So we have the repository for the items, you may optionally add some indexes to the columns in the SQL Management Studio to be able to server large loads effectively. Just note that the indexes won't go with the import/export, you need to ensure them manually.
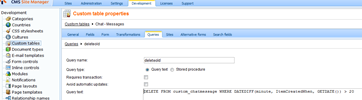
Cleaning up old items
Now we need to say that we want to delete outdated items. So we define some queries that will do that for us.
Create new
Query under the Custom table "Chat - Messages":
Query name: deleteold
Query text:
DELETE FROM custom_chatmessage WHERE DATEDIFF(minute, ItemCreatedWhen, GETDATE()) > 20
This one removes all messages older than 20 minutes when executed.
And the second query under the Custom table "Chat - Members":
Query name: deleteinactive
Query text:
DELETE FROM custom_chatmember WHERE DATEDIFF(minute, MemberLastPresent, GETDATE()) > 2
This one removes all the chat users that were not present for more than 2 minutes. You may somehow modify it to use the other activity field, too.
If you want to modify the time for the items to stay, just adjust the queries accordingly.
As next, prepare the Scheduled task provided from App_Code, modify file ~
/App_Code/Global/CMS/CMSCustom.cs like this:
using CMS.Scheduler;
using CMS.EventLog;
using CMS.DataEngine;
public static object GetCustomClass(string className)
{
switch (className)
{
case "Custom.ChatDeleter":
return new ChatDeleter();
}
return null;
}
public class ChatDeleter : ITask
{
public string Execute(TaskInfo taskInfo)
{
try
{
// Delete the old items
GeneralConnection conn = ConnectionHelper.GetConnection();
conn.ExecuteQuery("custom.chatmessage.deleteold", null);
conn.ExecuteQuery("custom.chatmember.deleteinactive", null);
}
catch (Exception ex)
{
EventLogProvider.LogException("Chat", "DELETEOLD", ex);
}
return null;
}
}
This will ensure calling our new queries from our custom tables, the queries will handle the deletion of outdated items.
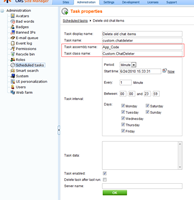
Just register the scheduled task running every minute or two (that is up to you how often you want to do the cleanup), with:
Assembly name: App_Code
Task class name: Custom.ChatDeleter
Preparing the activity queries
Add two more queries to the custom table "Chat - Members":
Query name: updateactivity
Query text:
IF EXISTS (SELECT ItemID FROM custom_chatmember WHERE MemberUserID = @UserID)
UPDATE custom_chatmember SET MemberLastActive = GETDATE(), MemberNickName = @NickName WHERE MemberUserID = @UserID
ELSE
INSERT INTO custom_chatmember (ItemGUID, MemberUserID, MemberNickName, MemberLastActive, MemberLastPresent)
VALUES (NEWID(), @UserID, @NickName, GETDATE(), GETDATE())
This one is little longer, what it does is it ensures the user in the members table, and updates the user activity timestamp.
Query name: updatepresence
Query text:
IF EXISTS (SELECT ItemID FROM custom_chatmember WHERE MemberUserID = @UserID)
UPDATE custom_chatmember SET MemberLastPresent = GETDATE(), MemberNickName = @NickName WHERE MemberUserID = @UserID
ELSE
INSERT INTO custom_chatmember (ItemGUID, MemberUserID, MemberNickName, MemberLastActive, MemberLastPresent)
VALUES (NEWID(), @UserID, @NickName, NULL, GETDATE())
This is the same as above, just for the presence time stamp.
The reason I didn't use the API is simply because this will be faster if the chat gets more load.
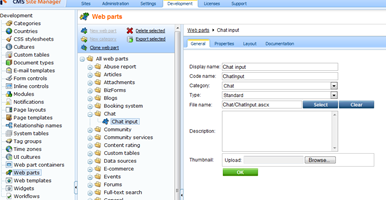
Putting a face to the chat module
I will start with the hardest part, because we need it to be able to actually test the other parts on live site. So let's prepare the input field for the messages. Create a new Web part called Chat Input. With following ASCX code:
<%@ Control Language="C#" AutoEventWireup="true" CodeFile="ChatInput.ascx.cs" Inherits="CMSWebParts_Chat_ChatInput"
EnableViewState="false" %>
<asp:Panel runat="server" id="pnlInput" DefaultButton="btnSubmit">
<asp:TextBox runat="server" ID="txtText" CssClass="TextBoxSend" />
<asp:DropDownList runat="server" ID="drpMembers" DataTextField="MemberNickname" DataValueField="MemberUserID" CssClass="DropDownFieldSmall" />
<asp:Button runat="server" ID="btnSubmit" OnClick="btnSubmit_Click" Text="Send"
CssClass="ContentButton" />
</asp:Panel>
And following code behind:
using System;
using System.Collections.Generic;
using System.Web;
using System.Web.UI;
using System.Web.UI.WebControls;
using System.Data;
using System.Web.Caching;
using CMS.PortalControls;
using CMS.SiteProvider;
using CMS.GlobalHelper;
using CMS.CMSHelper;
public partial class CMSWebParts_Chat_ChatInput : CMSAbstractWebPart
{
#region "Variables"
CurrentUserInfo currentUser = null;
CustomTableItemProvider pr = null;
#endregion
protected override void OnInit(EventArgs e)
{
base.OnInit(e);
currentUser = CMSContext.CurrentUser;
// Get the data
pr = new CustomTableItemProvider(currentUser);
DataSet ds = null;
// Cache the data for DDL
using (CachedSection<DataSet> cs = new CachedSection<DataSet>(ref ds, 1, true, "chatmembers"))
{
if (cs.LoadData)
{
// Get from database
ds = pr.GetItems("custom.chatmember", null, "MemberNickName", 0, null);
// Add all item at the start
DataTable dt = ds.Tables[0];
DataRow dr = dt.NewRow();
dr["MemberNickName"] = ResHelper.GetString("Chat.All", null, "(to all)");
ds.Tables[0].Rows.InsertAt(dr, 0);
// Add to the cache
cs.CacheDependency = CacheHelper.GetCacheDependency("chatmembers|all");
cs.Data = ds;
}
}
// Bind the members
this.drpMembers.DataSource = ds;
this.drpMembers.DataBind();
// Update user activity
object[,] parameters = new object[2, 3];
parameters[0, 0] = "@UserID";
parameters[0, 1] = currentUser.UserID;
parameters[1, 0] = "@NickName";
parameters[1, 1] = currentUser.FullName;
pr.Connection.ExecuteQuery("custom.chatmember.updatepresence", parameters);
}
protected override void OnPreRender(EventArgs e)
{
base.OnPreRender(e);
if (!IsPostBack)
{
ScriptHelper.RegisterStartupScript(this, typeof(string), "Focus", ScriptHelper.GetScript(
@"function FocusBox() { document.getElementById('" + this.txtText.ClientID + @"').focus(); }
window.focusAttempts = 5;
setInterval('if (focusAttempts-- > 0) FocusBox();', 100);"
));
}
else
{
ScriptHelper.RegisterStartupScript(this, typeof(string), "Focus", ScriptHelper.GetScript(
@"window.focusAttempts = 5;"
));
}
}
protected void btnSubmit_Click(object sender, EventArgs e)
{
Send();
this.PagePlaceholder.ReloadData();
}
/// <summary>
/// Sends the message
/// </summary>
protected void Send()
{
if (!currentUser.IsPublic())
{
// Insert new message
CustomTableItem cti = new CustomTableItem("custom.chatmessage", pr);
cti.SetValue("MessageText", this.txtText.Text);
cti.SetValue("MessageFromUserID", currentUser.UserID);
cti.SetValue("MessageFromNickName", currentUser.FullName);
int toUserId = ValidationHelper.GetInteger(this.drpMembers.SelectedValue, 0);
if (toUserId > 0)
{
cti.SetValue("MessageToUserID", toUserId);
cti.SetValue("MessageToNickName", this.drpMembers.SelectedItem.Text);
}
cti.Insert();
// Update user activity
object[,] parameters = new object[2, 3];
parameters[0, 0] = "@UserID";
parameters[0, 1] = currentUser.UserID;
parameters[1, 0] = "@NickName";
parameters[1, 1] = currentUser.FullName;
pr.Connection.ExecuteQuery("custom.chatmember.updateactivity", parameters);
this.txtText.Text = "";
// Drop the members cache
CacheHelper.TouchKey("chatmembers|all");
}
}
}
It isn't exactly short, but given the fact that that is all the code you need to have for your chat, it is not too much, isn't it?
Let's see what the webpart does ...
-
We have a text input, dropdown with available users on chat (to select to who I want to send the message), and a submit button
-
Upon OnInit, the web part fills in the dropdown with available users, that list of users is cached depending on the change to the list of users
-
Upon PreRender, it just makes sure that the text input is the focused field so user can just type the next message right away. Note that I had to use a little hack to make it work as expected in all browsers.
-
The last part is the submit button handler, which uses Custom tables API to insert new message, and informs the Page placeholder (template) that it needs to refresh all components data.
-
You may also notice, that on any request, it logs the presence using our presence query and on any input it logs the activity.
So shortly, we have an input field web part for our chat. Register the web part within site manager. it does not have any properties, so just register it without any additional modifications.
If you don't have the Timer web part from the
DIY: How to make the zone auto refresh ensure that one, too.
Let's display the messages and present members together with it on the page template.
Create a chat page
Create new page under the root and call it "Chat". It will be menu item, blank page based on the simple layout, we will just change the layout in the design mode to:
<table border="0" width="100%">
<tr valign="top">
<td width="70%">
<cc1:CMSWebPartZone ID="zoneInput" runat="server" />
</td>
<td width="30%" rowspan="2">
<cc1:CMSWebPartZone ID="zoneMembers" runat="server" />
</td>
</tr>
<tr valign="top">
<td>
<cc1:CMSWebPartZone ID="zoneMessages" runat="server" />
</td>
</tr>
</table>
We created the 3 zones on purpose, not only to define the layout, but also to separate the messages from the input field so we can refresh the messages independently.
Just go to the design mode and add the
Chat input web part to the zone
zoneInput.
Display the messages
Since we have all the data in Custom tables, and since we need to display the list of items in both cases, the obvious option is to use the Custom table repeater to do that. Let's go first for the list of messages.
Add the
Custom table repeater web part to the zone
zoneMessages. With following properties:
-
Custom table = Chat - Messages
-
Transformation name = custom.chatmessage.default
-
Order by = ItemCreatedWhen DESC
-
Where condition = MessageToUserID IS NULL OR MessageToUserID = {%CurrentUser.UserID%}</div>
Display the members
Not surprisingly, we do the same for the list of members present on the chat, so we do the same in zone zoneMembers. This time, the repeater will use the settings:
-
Custom table = Chat - Members
-
Transformation name = custom.chatmember.default
-
Order by = MemberNickName
-
Cache minutes = 0
And the default transformation will be just:
<div><%# Eval("MemberNickName") %></div>
We want to refresh this part too, so we set the zone using update panel, and add the timer for 10000 ms (10 seconds) refresh (we don't need that often refresh here).
It would probably be a good idea to add some static text on top of the zone, to inform user what he can see, e.g.:
<h2>People on the chat</h2>
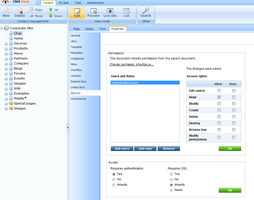
Make it available only to authenticated
And because this chat can only be used by the authenticated users, go ahead and set this page to require authentication in its security properties. And we will also need to say that everyone is able to read it (to grant them permission to see it with default settings).
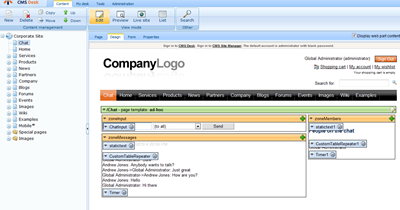
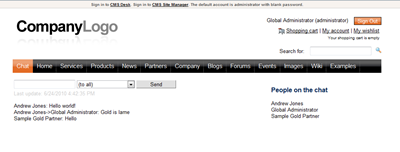
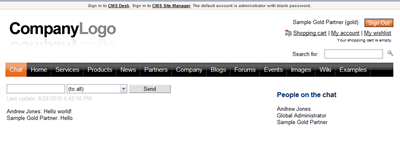
How the result looks like
Let's see what you can see in the design mode and on the live page if you just send some messages, you can see that if you send a private one, it is displayed only to the right people:
Full package
Here is the import package with all the components from this post, you just need to import it, create the page using the template Chat from the Chat category, and set the security on the page. Then, it should work as my example here.
chatModule_components.zip (16 kB)
What is the next step?
I typically recommend to test it, but that is up to you, you sure can get the lunch / dinner / breakfast first. We are finished and by this time, your very first chat module implemented in Kentico is working.
Definitely, it needs some improvements to be put live, it is meant to teach you how to do things.
Congratulations and enjoy!