ICQ gateway in Kentico CMS
First I will describe you the process of creating custom notification gateway, then I will follow this process to create ICQ notification gateway. Finally, I will mention workaround for sending timed notifications.
Since version 4.0 there is a support for
sending notifications to content changes. It means user can subscribe to obtain e-mail message when some document is created, updated or deleted. You can even build your custom notification provider. I will describe you the process of customization by creating ICQ notification gateway. Its code is included in the ICQ assembly which can be downloaded as part of the installation package from our marketplace.
ICQ assembly
You can use it either for sending ICQ messages to anyone using ICQ Provider API (ICQ gateway) or for sending ICQ notifications to content changes (ICQ notification gateway). Here is the complete list of the classes included in the ICQ assembly:
ICQ gateway
Following two classes represents the base ICQ provider for sending ICQ messages. It means you can simply use it to log in to your ICQ account, initialize ICQ message and send it to another ICQ number. Finally you can log out.
-
ICQMessage.cs - Simple data container representing ICQ message.
-
ICQProvider.cs - Simple ICQ provider which enables user to send ICQ message. Any work with ICQ message is implemented in the way of using ICQMessage class.
ICQ notification gateway
Following class represents the ICQ notification gateway for sending ICQ messages to content changes.
-
ICQNotificationGateway.cs - custom notification gateway, integration is built on the customization model mentioned below. It uses ICQMessage and ICQProvider classes.
Custom notification gateway
Here's a general overview of the process of integrating a custom notification gateway:
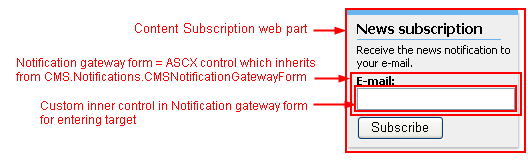
1) Create a notification gateway form with your custom inner control(s) for entering the target where the notification message should be sent.
In case of the built-in E-mail notification gateway there is only simple textbox for entering e-mail address, see the image bellow. In general, it can be any control or set of controls, it depends on the notification gateway requirements.
-
Create a new web user control (*.ascx) and place it into your site folder which is located in the root of your web project. Of course, you can place it anywhere in your web project but since the control is located in the site folder it is included in export package of your site.
-
Set control's class to inherit from class CMS.Notifications.CMSNotificationGatewayForm
-
There are two methods and one property you will need to override to reach your required functionality:
-
object Value - Gets or sets the value from the custom inner control. Example: Gets or sets the text of the inner TextBox.
-
string Validate() – Validates inner control's value and returns error message if value doesn't meet the requirements of the notification gateway. Example: TextBox value is validated for e-mail address format for E-mail notification gateway.
-
void ClearForm() – Your custom code inside this method should set the inner control to the default state. Example: Text of the TextBox should be cleared (set to the empty string).
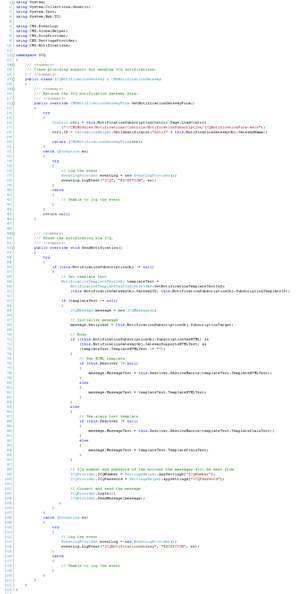
2) Create your custom notification gateway class which handles loading correct notification gateway form and sending notification messages.
-
Create a new library (assembly) as a part of your solution and a new class inside this library.
-
Set your class to inherit from abstract class CMS.Notifications.CMSNotificationGateway.
-
There are two methods you will need to override to reach your required functionality:
-
void SendNotification() – Sends single notification. It is automatically called after the specified event is raised.
-
CMSNotificationGatewayForm GetNotificationGatewayForm() – Loads and returns notification gateway form for that notification gateway.
-
Compile the library.
-
Ensure the library file (*.dll) is included in /Bin directory.
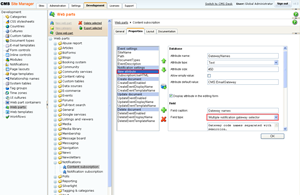
3) Register your custom notification gateway in Site Manager -> Development -> Notifications section and create some template for notification message.
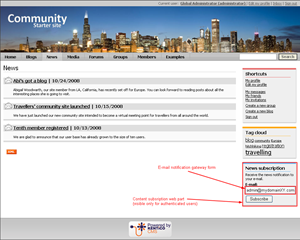
4) Place Content subscription web part into your page and configure it to allow users to subscribe to the content changes which will be notified by your custom gateway.
Extending Content Subscription web part
By default Content Subscription web part is set up to create subscription only to the built-in E-mail gateway when Subscribe button is clicked. It means only E-mail gateway will send notification message when specified content change happens:
Let's extend that web part's possibilities to enable users to obtain notification message from multiple gateways including our new ICQ notification gateway. This functionality was reached by adding new field to the web part properties and by simple change to the web part's code. The control of this field enables editor to specify multiple gateways the user can subscribe to:
ICQ notification gateway
We became familiar with the process of creating custom notification gateway, we made necessary modifications to the Content subscription web part. Now we are ready to create our ICQ notification gateway:
1) Create ICQ notification gateway form
It will be very similar control to that which is used by built in E-mail notification gateway. The only difference will be in validation of the entered value.


2) Create ICQ notification gateway class
Again, code is very similar to class which handles sending e-mail notifications. The difference is in loading form control for subscription and way of sending notifications:
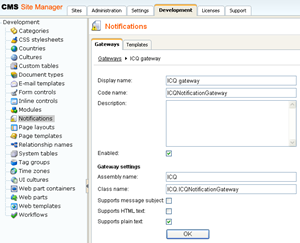
3) Register ICQ notification gateway
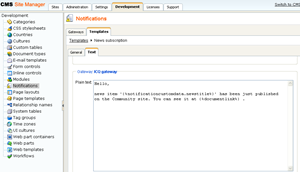
Go to the CMS SiteManager -> Development -> Notifications section. Click New gateway to register new notification gateway. Register ICQ notification gateway and specify some template for sending notification messages:
4) Enable subscriptions to the new ICQ notification gateway
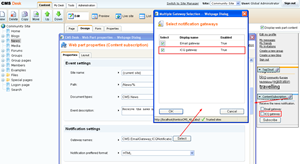
Edit Content subscription web part's properties.
-
Choose ICQ notification gateway as one of the gateways the user will be subscribed to when clicking the Subscribe button. It means user can subscribe to multiple gateways at once. If this happens user will obtain notification message from all those gateways when the specified content will be changed.
-
Choose template which will be used for notification message.
5) Specify your log on information to ICQ gateway
Modify web.config file - add following settings to specify ICQ number and ICQ password of the account the notification messages will be sent from:

Sending timed notifications
I have already got several requirements from our support team to integrate timed notifications. It means support for collecting events during the specified period and sending them in a single notification message. Now the notifications are sent immediately after the content is changed. It means if user is subscribed to be notified about all content changes he is notified about each of them by single notification message (one document change = one notification message). I know it can be quite boring when subscriber will found 50 e-mails in his inbox when 50 documents are changed instead of one message with all changes. Fortunately, you can use the knowledge of creating custom notification gateway to make some kind of workaround:
1) Create custom notification gateway form for entering e-mail address.
2) Create custom notification gateway class which will not perform sending the notifications to the specified e-mail addresses BUT it will store them to your custom table in database.
3) Define scheduler task which will check your custom table in specified period for notifications which are waiting for sending.
4) For each subscriber build single e-mail message from his notifications which were found in your custom table and send it.
It sounds like a great tip for all of you who would like to win $1000 in our marketplace competition, doesn' it? If you make it I will definitely vote for you ;)
In my next post I will describe another add-on from my team. Keep in touch with my blog if you are interested.
Peter